
Shattered by more and heavier bomb hits than any other carrier, HMS Illustrious nevertheless managed to contain her fires, stem the flooding and limp into the relative safety of Malta.

Blast effect ... the 'Starboard 1' forward Pom Pom gun sits jammed by the collapsed 'Jumbo' crane as the wreckage of "S2" Pom Pom mount still smoulders in the foreground. It had probably been struck by a contact-fused German General Purpose bomb.
Stone sanctuary

At last, the tugs came in to view. Lines were secured at 2025.
Listing and down by the stern, HMS Illustrious was dragged, still burning, through Grand Harbour’s entrance. Onlookers told of her hull glowing orange in the dark.
The battered carrier finally berthed at Parlatorio Wharf in French Creek at 2215.
Dockyard workers rushed aboard, bringing with them breathing and firefighting equipment to tackle the blaze still burning in the aft end of the hangar. The fires were not put out until 0300 the following morning.
HMS Illustrious’ casualty list was terrible: 126 dead and 91 wounded.
Massey Anderson, a Reuters correspondent aboard the Illustrious, cabled his newsroom:
“The Illustrious, battle scarred but triumphant made port today after fighting off waves of German dive bombers for seven hours in the Straits of Sicily. Goering’s Luftwaffe had swooped out of the sky in this first Mediterranean action and had given her one of the severest poundings ever delivered from the air against a single ship.”
CLICK on the image above for a larger view
Operation Excess’ warships – now without air cover – continued to suffer.
X Fliegercorps’ made a sortie against the convoy the next day.
The escorting six-inch cruiser HMS Southampton was caught by 12 Ju87R Stukas of II/StG2 and hit by two bombs. With most of her key damage control personnel among the 80 killed, the cruiser had to be scuttled. Her sister ship, Gloucester, was also damaged by an unexploded bomb which had penetrated five decks into the cruiser’s heart.
Illustrious’ ordeal was not over.
What ensued until January 23 was to become known as the “Illustrious Blitz”.
All crew other than the anti-aircraft gunners and some essential personnel were eventually ordered off the ship. Illustrious’ guns added to Malta’s tired and strained defences.
The Germans, however, were not fully prepared for large scale attacks against a well-defended installation. They had focused their hasty preparations for the attack on Illustrious. They would spend several days getting ready to brave Malta’s barrage.
Her Fulmars contributed also: Three joined four Hurricanes and two Gladiators in protecting the carrier on January 16.

The tangled mess that was the mobile 'Jumbo' crane after being lifted off the "S1" PomPom. The shattered remains of "S2" PomPom is to the right.
Spirit of Malta
Dock workers worked furiously from the moment HMS Illustrious tied up on January 11 until the moment she left. They were ordered to ignore the flight deck and concentrate on getting the carrier seaworthy enough to make a dash for the safer port of Alexandria.
One pilot returned to the ship to salvage his belongings:
“The whole flat was dark and knee deep in oily water – I retreated, to find that my cabin had become one large hole, also full of oily water. My clothes were gone – I possessed only what I stood up in.”

ILLUSTRIOUS's forward lift, buckled upwards by compression from the explosions in the hangar and aft lift well. In the extreme background the aft-lift can be seen sitting upside down on the flight deck. There is no sign of the 'petaled' metal seen in the action photo of the carrier's steaming and smoking flight deck.

The most urgent task was finding out what was wrong with the rudder motors and controls. This would be no easy task: The aft of the ship was flooded and she was down some 5ft by the stern. The spaces around the tiller flat were still smoldering and hot.
It would take some days before the blackened, tangled mass of steel would be cool and cleared enough to allow access to the steerage equipment.
The splinter holes in Illustrious’ bow were rapidly patched up as almost every pump in Malta was rushed to help drain her stern.
Considerable effort was put into lightening the ship and divers scoured her hull to plug and assess any underwater damage.
Senior Engineer Lt-Cdr Martin – who was overseeing the repairs as the Commander (E) was among the wounded - reported:
‘Her engines are not too bad, we’ll get her away alright’.

Malta's crane hoists the toppled lift platform out of ILLUSTRIOUS's shattered aft lift well. The lighter-coloured square patch in the bottom left of the picture appears to be covering the 2200lbs bomb penetration hole. The sailor to its left seems to be resting his foot on a small raised section - roughly where the apparently 'petaled' metal was in the famous photo showing ILLUSTRIOUS's burning deck.

On January 13, the buckled after lift was hoisted out of the blackened lift-well and set gently on the deck. The dock’s massive crane was left extending over the flight deck to help deter low-level attacks.
The light cruiser HMAS Perth docked in the harbour opposite Illustrious on the 14th. She, along with HMS Janus, had been detached from Excess to escort three merchant vessels to Valetta harbour. Now the cruiser’s four twin 4in HA mounts would contribute to the harbour’s defence of Illustrious.
It was not until January 15 that workers were able to reach the tiller flat to assess the damage to Illustrious’ steering gear.
What greeted them was something of a relief.
The equipment was un-damaged. Flooding had caused a solenoid valve to jam open, allowing oil to escape.
Despite the good news, the night of the 15th was ominous.
Malta was to experience a record number of raid warnings that night, and the drone of aircraft was almost constant overhead. But no attacks developed until the afternoon of January 16.
Malta was to feel the full wrath of the jilted German Luftwaffe.
The island was to suffer 58 air attacks that January.
X Fliegerkorps was instructed once again to sink Illustrious - as well as the tied-up merchant vessels that had slipped their vital supplies through the gauntlet unscathed.

Hard target ... the damaged HMS Illustrious sits in a dock under a large crane as bombs burst in the city of Valletta about her.
Attack 7
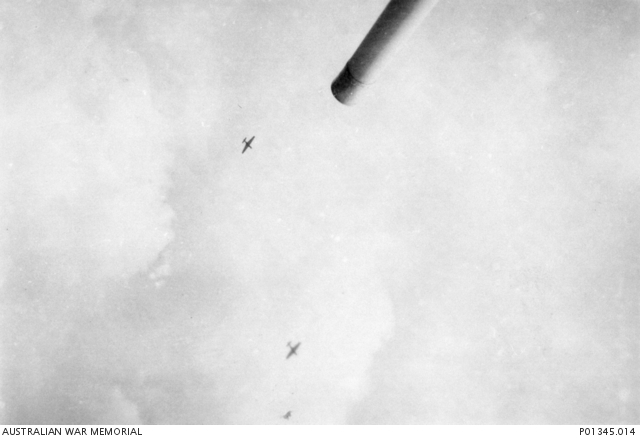
The first raid was detected by Malta’s air defence system at 1355 on January 16.
Two waves of 44 Ju87s and 17 Ju88s from II and III /LG1 with an escort of ten C202s, ten CR42s and 20 Bf110s were to form the largest attack on the island to date.
It had the specific goal of destroying Illustrious.
In the words of one of the Stuka pilots:
‘But now we got strict orders to do our best to make this ship sink. We went to Cantania air station and there loaded 1000kg bombs. With these bombs under the belly we needed about 1 1/2 hours to reach an altitude of 3000m [10,000ft].
Four of these bombs we succeeded in dropping on the deck of Illustrious, but she did not sink for our bombs were not able to penetrate the armoured decks below and because of numerous bulkheads’
Four Hurricanes, three Fulmars and two Gladiators rose to meet them. Their orders were to stay away from the harbour. They were to intercept only outside Valetta’s defensive flak umbrella.
One incident involving the bravery of HMS Illustrious’ remaining Fulmars would pass into legend this day. Despite the pilots being warned not to enter the harbour area, a Fulmar chased a Stuka right through the barrage.
The Stuka was attempting to escape by flying very low to the water, rising only to lift above a breakwater. This gave the Fulmar a chance to catch up and open fire. The Stuka was seen to crash into the sea.
Upon landing, Malta’s artillery command office was to receive a terse message: The pilot stated that he did not think much of the accuracy of the AA gunners’ fire which had missed the Stuka but had badly damaged his own aircraft. The Fulmar apparently never few again.
Malta’s dockyards were extensively damaged in the attack.
Two large bombs (most likely dropped by the Ju88s) fell between Illustrious and Perth. One bomb passed between the cruiser and the wharf. The detonation lifted the 7000ton cruiser’s stern and buried her bow underwater. The blast bent propeller shafts, burst oil bunkers and knocked X and Y turrets off their roller bearings.
Gunnery Officer, Lieutenant W.S. Bracegirdle, aboarad HMAS Perth: Ahoy – Mac’s Weblog, http://ahoy.tk-jk.net
I pressed the action alarm signal and we went to full Action Stations. So did the carrier and the little submarine. I was smoking my new pipe. Breaking it in. The army and Maltese defences opened fire. The bursts were out to sea but just visible above the rooftops of the houses, behind the dockyard crane and chimney stacks. The barrage increased in ferocity. Hundreds of shell bursts were dotting the sky – tracer from the 40 mm Bofors now criss-crossed the sky, the shells later exploding above 4000 ft. That meant the enemy were coming in low. The Illustrious opposite suddenly opened fire with every gun she had – 4.5 inches and 40 mm. Right through our wireless aerials. She, with four higher decks, had seen them. Our wireless aerials came down, shot away by the carrier. Then we saw them. I counted four groups of five aircraft. Twenty Stukas with a high fighter cover of M. E. 109s.12 They came weaving in over the rooftops kicking rudder bars right and left to put off our aim. Then we opened fire. The din was terrific. Illustrious’ red tracer just clear of our masts. I turned to see the little submarine in dock. Sluice gates open – water flooding around her for some protection. Submarine Captain and gun’s crew all exposed waiting for the ship to be floating so they too could fire their one 4-inch gun. Their twin Lewis guns in action. The mad barrage increased, Illustrious fighting desperately to ward off these vicious dives. All ships were sitting duck targets. Then the bombs rained down. The shorts in the dockyard. Overs in the water. Enormous crumps, crashes and vibrations. Water spouts in Dockyard Creek. Blast waves. Debris. More targets coming in. All the enemy painted with yellow noses – the ‘first eleven’ Goering Squadron colours. God how they could fly. I saw one come down in flames and blow up on hitting the ground but they came on and on.
Perth’s crew had little time to worry about their own troubles: the ammunition ship Essex had been hit and set afire behind them. The crew rushed fire hoses to her aid.
Only one 1100lb bomb - delivered by a StG1 Stuka - penetrated the furious defence. It struck Illustrious on the aft flight deck, plunging 13ft through the ship to explode in the captain’s day cabin.
This was to significantly add to Illustrious’ damage: The dockyard now held grave fears for the structural strength of the carrier’s stern as many of the remaining pillars and transverse girders were shattered. With fears vibrations could cause the aft structure to detach, considerable effort was expended in welding new – temporary – supporting beams in place.
That night, HMAS Perth slipped quietly out of harbour. She was the lucky one.
Stukas enter their dives above the guns of HMAS Perth.
Attack 8
Illustrious was attacked again on January 17, with several near-misses reported but no significant damage.
The next day, January 18, X Fliegerkorps changed tactics
It went after the airfields, aiming to eliminate the fighter defence that had disrupting their attacks on Malta’s harbour.
Five Hurricanes and three Fulmars rose to the defence. One of 806 Squadron’s Fulmars was shot down into the sea.
Jock Lawrance, quoted in Mike Carlton's Cruiser: The Life And Loss Of HMAS Perth And Her Crew
As we went on board, Maltese were carrying bags down the other gangway. I said to one of the Maltese: ‘What’s that?’
He said: ‘This was a man.’
Blood was coming through the sacks … it was a bloodbath, right throughout the ship. There was a paymaster with his head blown off. He was sitting at his desk like he was reading, but dead, with his head blown off. A piece of shrapnel had come through and whipped his head off. He was still there with a pen in his hand. I just shut the door again. The shrapnel went right through the bulkheads just like it was tissue paper.
And they had a Stuka in the lift. Dead. Shot down. It had a big swastika on its tail. But the Illustrious was a butcher’s shop. There was a big engineer officer, a big bloke in his white overalls, still had his torch on, and a piece of shrapnel had taken out his stomach, just like that. That was the first time I’d seen bodies in war. It was shocking, blood everywhere.

Tangled mess ... HMS Illustrious' crew examines the blackened and mangled remains of the aft lift well. The lift platform itself sits on its edge at the far left of the image. Work has begun to attach cables to it for Malta's crane to hoist out and on to the deck.
Attack 9
During the final big raid on the harbour, on January 19, only one Fulmar was able to fly off with one Gladiator and six Hurricanes. Between them they claimed 11 enemy aircraft destroyed while the ground defences claimed a further eight.
806 Squadron’s Robert Henley claimed one of the kills before himself being forced to ditch.
“I recall a fairly massive raid of Ju 87s and Ju 88s, with all available fighters scrambled – some four Fulmars – and we just flew around uncontrolled, shooting at anything that came within range. The poor old Fulmar had problems gaining height and speed against the Ju88s. My aircraft was hit, I think to my embarrassment, by a Ju87, which stopped my engine some miles east-south-east of Hal Far, and I decided to glide as close to Malta as possible because (a) my TAG – NA Rush – told me, at this point, that he couldn’t swim and (b) there seemed to be so many aircraft about and such chaos reigning that I doubted that two little parachutes five-ten miles out to sea would be noticed.”

Henley had, however, managed to claim kills on a Ju88 and a Ju87 that day.
A new weapon was deployed against Illustrious during this raid, without success. A ‘glider bomb’ fell into Valetta and demolished a nunnery, though it failed to explode. It was disarmed and urgently flown back to Britain for analysis.
Repairs to HMS Illustrious had been assessed as being good enough to allow the ship to leave harbour on January 20. This was not to be.
On this day several German bombers were able to penetrate the defences and deliver their payloads over the carrier.
Illustrious was near-missed twice. One 1100lb bomb exploded on the port side, smashing plating and causing enough flooding to induce an immediate 5 degree list. Shockwaves from the blast cracked the port turbine feet and shook other machinery out of alignment.
Ironically, it was probably the dust from this raid - blasted up to heights of 1000ft or more - that shielded the carrier from more extensive damage.
For Malta’s weary dockyard crews, it was a case of “back to work”.
In the case of diver Joseph Gauci, it was particularly dangerous.
He knew that if Illustrious was bombed again while he was beneath her hull, even a near-miss would send a shockwave through the water that would kill him instantly. His heavy equipment ruled out any escape.
Nevertheless the admiralty diver completed his work before the next raid. As a result the dockyard workers were able to begin work on patching-up the carrier once again.
Illustrious’ battered stern was in desperate need of strengthening – lest it topple into the water and expose the carrier’s bowels to the inrushing sea.

Escape
HMS Illustrious slipped out of Valetta Harbour at 1846 on January 23 when it was considered too dark for any reconnaissance aircraft to notice.
The carrier accelerated to 25 knots and made towards Alexandria.
It is said she was in such a haste to leave dock that she sailed out of the harbour with cables streaming in her wake. Illustrious was going so unexpectedly fast she missed the cruiser squadron assigned to protect her.
While the Germans and Italians were caught off-guard, It would not be an uneventful two-day passage.
By 0800 Illustrious’ had begun to make a considerable amount of smoke, so her speed was reduced to 21knots. The ship was determined to have only three hours of fuel oil remaining.
The remaining fuel tanks were contaminated with water.
The crew worked frantically to isolate damaged fuel lines and clear water from the tanks.
They would succeed.
Illustrious would increase speed back to 23knots – a speed she maintained until entering Alexandria Harbour at 1300, January 25.
There was only 60 tons of fuel oil left in her tanks.
It had been an epic ordeal.
In his report to the Sea Lords, Captain Boyd would summarise:
“In conclusion I wish to pay tribute to the sound construction of the ship which enabled her to withstand such heavy punishment.”

Reconstruction ... Workers at the US naval base of Norfolk work on the splinter-damaged bow of HMS Illustrious.

CLICK on the above image to be taken to the original pdf source. CLICK HERE to be taken to the armouredcarriers.com analysis of HMS Illustrious' bomb damage.
MORE ON ILLUSTRIOUS


RELATED LINKS
