“Air attacks on HMS Illustrious,
IMMEDIATE.
492. H.M.S. ILLUSTRIOUS was attacked at 1240 by about 25 dive bombers, by high level bombers at 1330 and again by 15 dive bombers at 1610 and by torpedo aircraft at 1920 and received six bomb hits and several near misses from heavy bombs estimated about one thousand pounds. Five bombers were JU. 87 with German markings. Armoured flight deck was pierced and several fires in forward section of hangar deck and officers quarters burnt out. Fire not finally extinguished until 0200. All fire control circuits in after group cut and conveyor hit. One pom pom destroyed. Both forward groups and five pom poms still in action. After lift wrecked and machinery out of action. Forward lift seriously damaged. Ship flooded abaft 136 bulkhead, probably some underwater damage. Ship is useless as a carrier until major refit has been carried out. Main machinery undamaged. Steering gear was put out of action and ship brought into Malta steering by engines. Casualties 83 killed 60 seriously wounded 40 light wounds approximately including several officers. ”

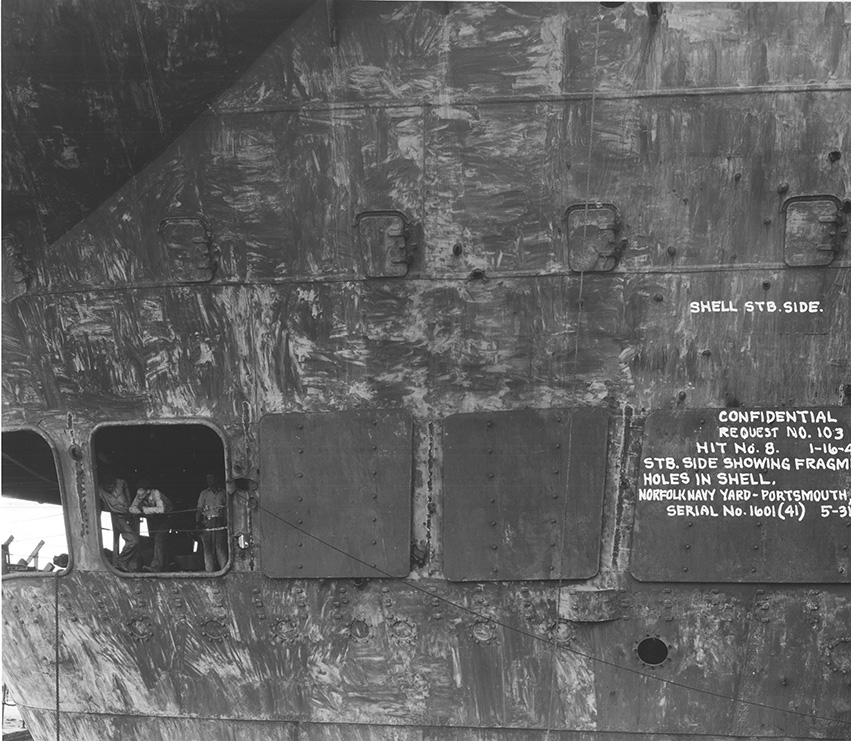
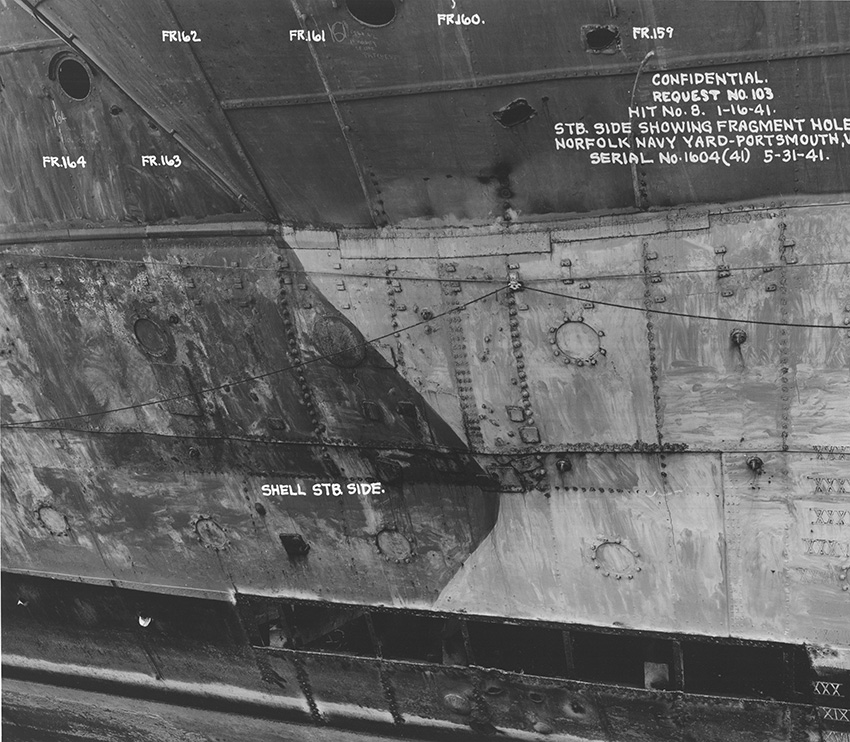
HMS ILLUSTRIOUS undergoing repairs at Norfolk Navy Yards. Picture courtesy Researcher at Large
Examining the battle damage suffered by HMS Illustrious can be a confusing affair. A key example is the sequence in which bombs hit, and what bomb sizes they were.
This confusion is the result of there being two separate reports with the same archival reference, ADM 267/83.

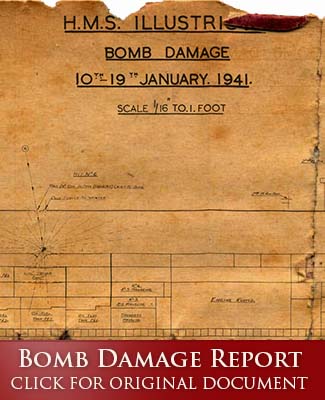
Captain Boyd's sketch of hit and near-miss locations drawn while in Malta immediately after the attack. CLICK HERE to see his full, original report.
One was produced by the captain in the days immediately after the carrier’s epic struggle for survival on January 10 (reproduced HERE), and conveyed to an anxious Admiralty on January 26. This report is the one most often cited by naval historians. The evocative and comprehensive account was compiled from the recollections and interpretations of events of command staff in Malta while struggling to get Illustrious back to sea while under X Fliegerkorps’ bombs. While inherently accurate, the devil is in the detail. For example, the order in which damage was reported to the bridge was not necessarily the order in which that damage was sustained.
The second report was compiled by naval intelligence officers and constructors (reproduced HERE) in the calmer months following HMS Illustrious’ arrival at the US Norfolk naval base for repairs.
GERMAN AIR FORCE ACTIVITIES IN THE MEDITERRANEAN.
TACTICS AND LESSONS LEARNED 1941 - 1943
5. Course of Events
A supply convoy sailing from Gibraltar to Malta and consisting of 23 ships, among them the aircraft carrier “Illustrious" and two battleships, sighted by our reconnaissance aircraft north of Bougie on 7th January, 1941. Fighter bombers and torpedo-carrying aircraft delivered a low-level and dive-bombing attack on the convoy south of Sardinia. Carrier aircraft presented no danger worth mentioning since they were of an obsolete type. Naval flak caused slight losses. Fighters based on Malta found the distance to the target area too great. Bad weather helped the sea operations so that parts of the convoy, including the "Illustrious”, reached Malta. There followed a series of day and night attacks by Ju88’s and HeIII's and day attacks by Ju87's and Me110's on ships in the harbour of Valetta and on airfields on Malta, Dive bombing and level flight attacks made from a medium height, in which escorting aircraft also took part, achieved on the whole good results. Several hits on the aircraft carrier by S.C. 1000 and 500 bombs were reported and confirmed in aerial photographs but she did not sink and on the 24th of January, under cover of bad weather, she left port for Alexandria. Our own losses were tolerable and were caused mainly by accurate flak and, to a lesser extent, by Hurricanes. Air supremacy over the Island was won in February, 1941.
Two of the Naval Engineers drawings of the damage sustained by HMS ILLUSTRIOUS. For the full original report and the accompanying drawings, CLICK HERE
Crew members were carefully debriefed. Sequences of events were reassessed and damage re-examined. Forensic evidence was gathered and fresh conclusions were drawn. So the sequence of hits – and the size of the bombs – in this official document differ from the rushed Malta report. Regrettably, it has not proven as popular among historians as the initial account.
For example, Hit 1 represents different events in each report. In the Captain’s report, it was the most noticeable impact from the bridge in the original attack: The destruction of the S2 Pom Pom mount. The later review found the first impact was, in fact, at the P1 Pom Pom mount – which was wrecked when a bomb passed through its platform and glanced off the armoured belt before exploding on contact with the ocean.
For the purposes of this overview, the sequence of events will follow that of the official Damage Report (Bomb & Shell) produced by the Admiralty reviewers. The Captain’s Report of Proceedings sequence of events will be recorded in brackets after the main title as a reference point to help decypher direct quotes.
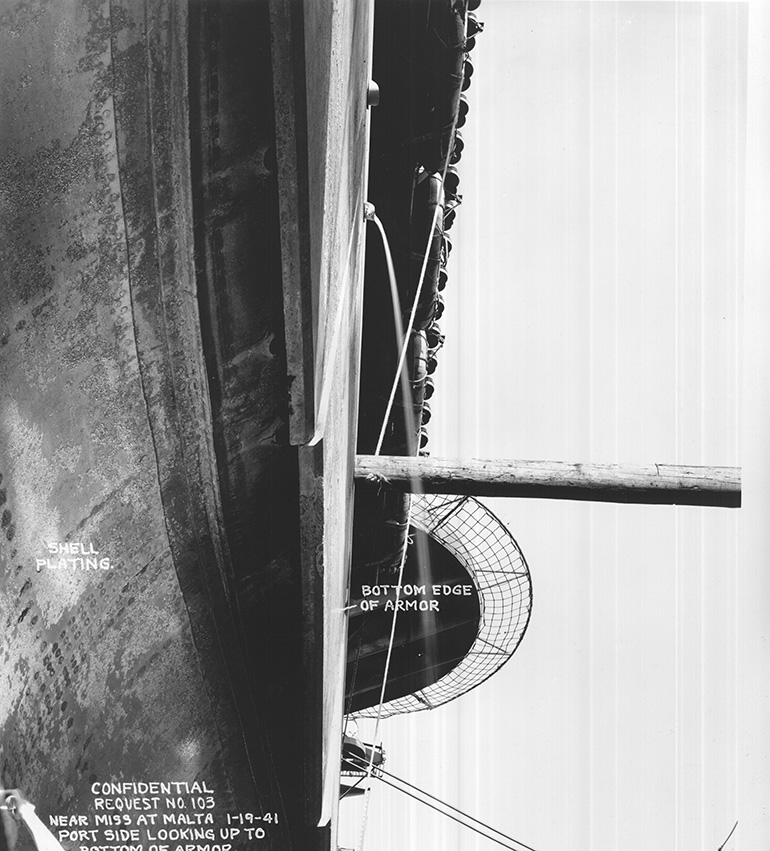
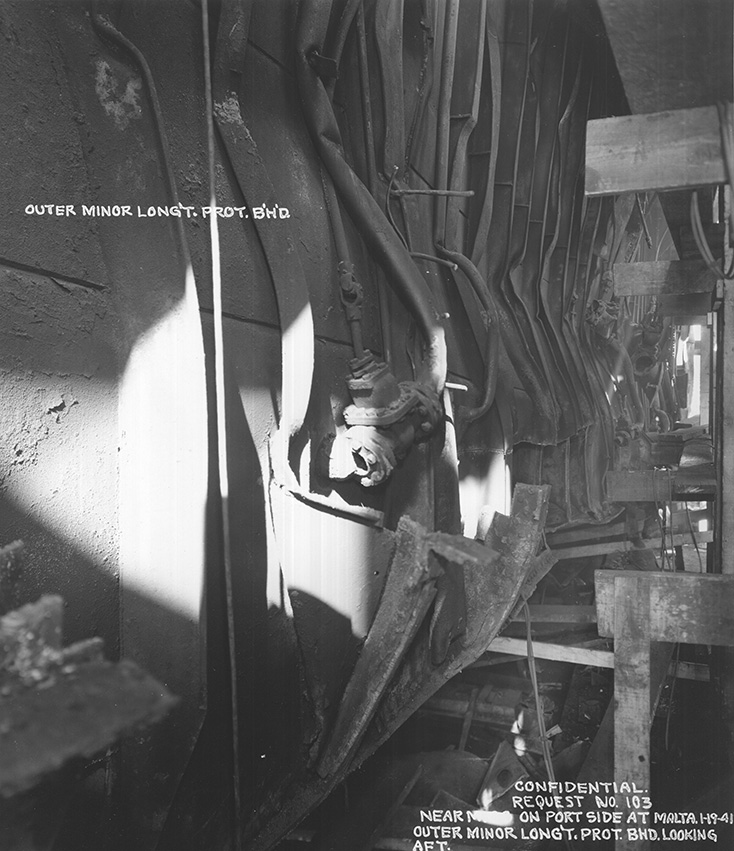
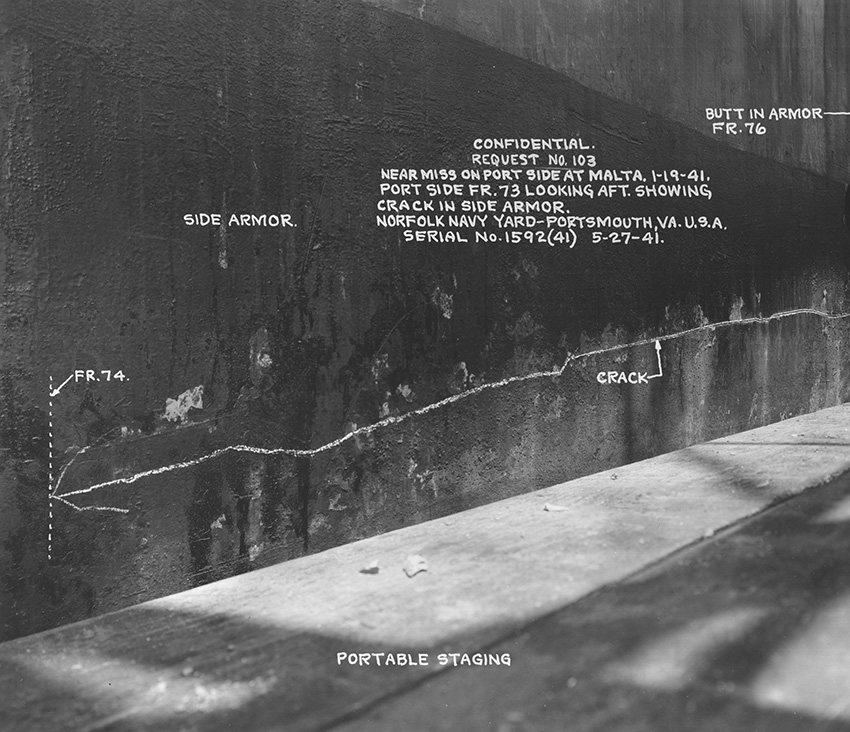
Below: Pictures of the Port-side near-miss sustained while docked at Malta. Images courtesy 'Researcher at Large'.
NEAR MISS No.1: STARBOARD, AFT
Exactly when a near-miss actually caused this damage is uncertain. Illustrious had been repeatedly tossed about by detonations in the water alongside. But, at some point early in the attack, a near-miss had caused flooding which would eventually affect the electrical steering gear.
NEAR MISS NO.2: STARBOARD, FORWARD
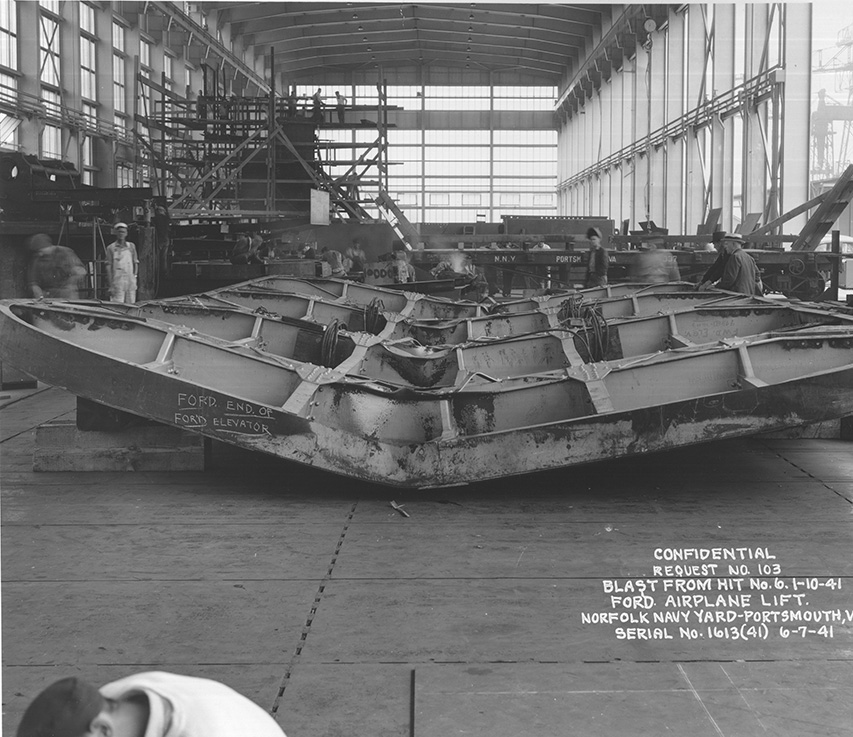
This large bomb burst close alongside Illustrious' forward lift about the same moment the second bomb detonated in her aft lift at 1242. The shockwave buckled the lift in an upward arc, causing it to direct onrushing air down into the burning hangar. The whip-lash also appears to have caused a section of the forward hangar floor to sag several inches.
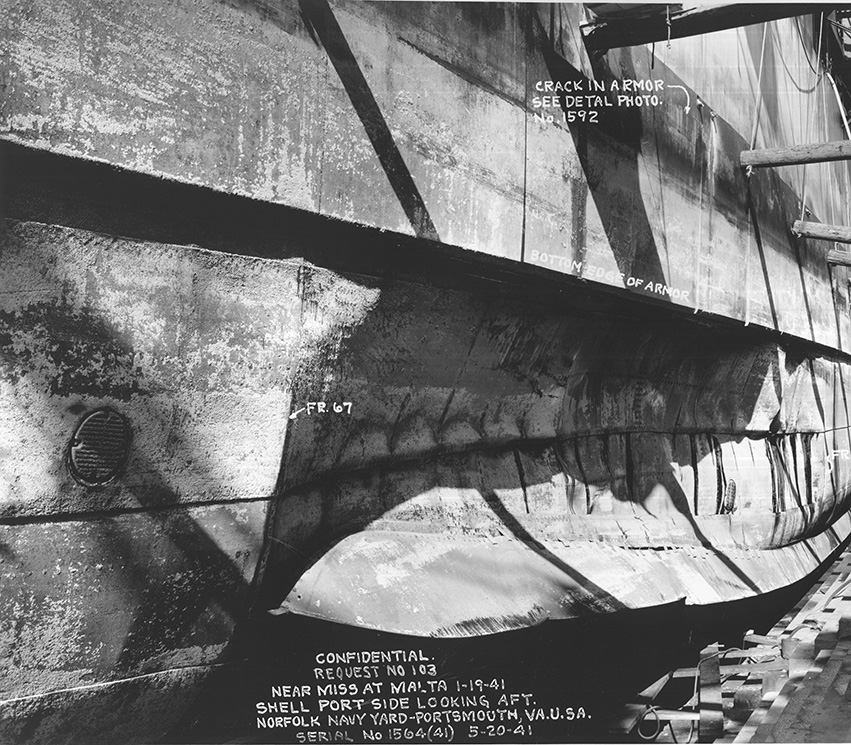
NEAR MISS NO 3: PORT SIDE, Malta dock
A heavy bomb passed within a few feet of the hull of Illustrious to detonate in the water alongside.
The blast pushed in the bottom edge of the side belt armour inward 3in, and the shell plating beneath that some 5ft. A dish some 75ft long was hammered into the hull, with flooding in the torpedo protection and fuel spaces causing a immediate list of about 5 degrees.
The port boiler room was temporarily put out of action as brickwork tumbled, and the sliding feet to the port turbines fractured.
OTHER NEAR MISSES
During the fourth attack, one bomb detonated in the water very close to the island. A single splinter hole penetrated the ship’s steel skin.
Another heavy bomb burst close to the starboard quarter deck which was being used as an emergency hospital. Splinter damage was sustained and many of the wounded – and those tending them – killed.
Illustrious' Fight For Life
Kenneth PoolmanTHE STUKAS CAME in from three bearings, port and starboard bows and starboard quarter, all at the same time. Bill Banham watched them, diving in groups of three from each direction, dove-tailed neatly together, clover-leaf fashion. Down they hurled through the 4.5 barrage and into the pompom screen.
Nothing could stop them. In a terrifying crescendo of crashing sound Illustrious disappeared in spray and smoke. All was bursting bombs, bursting shells, the racket of the guns and the roar and scream of aircraft.
They knocked the broadcasting system out of action and shattered the radar. A bomb hit P1 pompom on the port side for’ard, smashing the gun, killing two of its crew as it passed through the gun platform and exploded on hitting the water, sending jagged pieces flying upwards to kill and wound more men...
Damage Control HQ reported all the damage to Captain Boyd on the bridge, who was taking avoiding action with his eye on the diving Stukas...
CLICK image for full-size view: Top left, the P2 pom pom mount. Bottom left, the compressed hull plates from the near-miss.

An annotated photo from the Norfolk Navy Yard showing the damage done to P1 Pom Pom platform and the scar on the hull and armour from the bomb glancing off the side. Picture courtesy 'Researcher at Large'
HIT NO.1 (6): 500KG (1100LB), P1 POM-POM
A flurry of bomb hits experienced as the attack unfolded after 1238. The first went through the loading platform of P1 pom-pom and struck the top of the side armour belt.
This bomb had struck the right-hand feed rails of the pom-pom mount which had been trained at Red 140, starting a fire among the ready-use ammunition.
The bomb then passed through the trainer’s sponson platform and over the ships side before striking the junction of two armour plates. It was assessed to have then ricochet into the water without fully exploding.
The pom-pom mount was put out of service for the course of the action.
CLICK image for full-size view: Top left, the penetration in the flight deck. Left centre, the penetration holes from within the recreation space. Bottom left, the splinter holes as seen from inside Illustrious.

The scarred port bow of HMS ILLUSTRIOUS is seen in this picture believed to have been taken shortly after arriving in Alexandria.
Illustrious' Fight For Life
Kenneth PoolmanHigh-level bombers came over this time as well. Once again the ship lurched and staggered as bombs fell all around her. Noise between decks was terrifying, like a thousand Tube trains roaring out of the tunnel. A bomb smashed through the flight-deck and through the boys’ mess-deck. Passing out of the ship’s side it hit the water and exploded. White-hot metal shot in all directions, holing the ship in many places above and below the waterline and causing bad flooding in the unarmoured for’ard section.
HIT NO 2 (2): 500KG (1100LB), PORT BOW
This bomb was assessed by the DNC as probably being a 500kg (1100lb) SAP device. It passed through the edge of the light plating forming the unarmoured forward flight deck on the port side at No. 10 station.
It passed through the recreation space and exited through the bow-flare.
The impact was sufficient to activated its fuse, causing the delayed-action bomb to detonate while outside the ship some 10ft above the waterline.
The resulting splinter damage was intense – completely peppering the port bow with holes. The paint and spare anchor spaces were flooded and fires were started in the lamp room and decontamination room.
CLICK image for full-size view: Top left, the mangled 'Jumbo' crane in front of the destroyed S2 pom pom mount. Centre left, another view of S2 mount showing the buckled weather screen between it and the island. Bottom left, S1 mount and the wreckage of S2 as seen from the island.
This picture from the Norfolk Naval Yard shows the damage to the flight deck after the demolished S2 Pom Pom had been removed. Picture courtesy 'Researcher at Large'
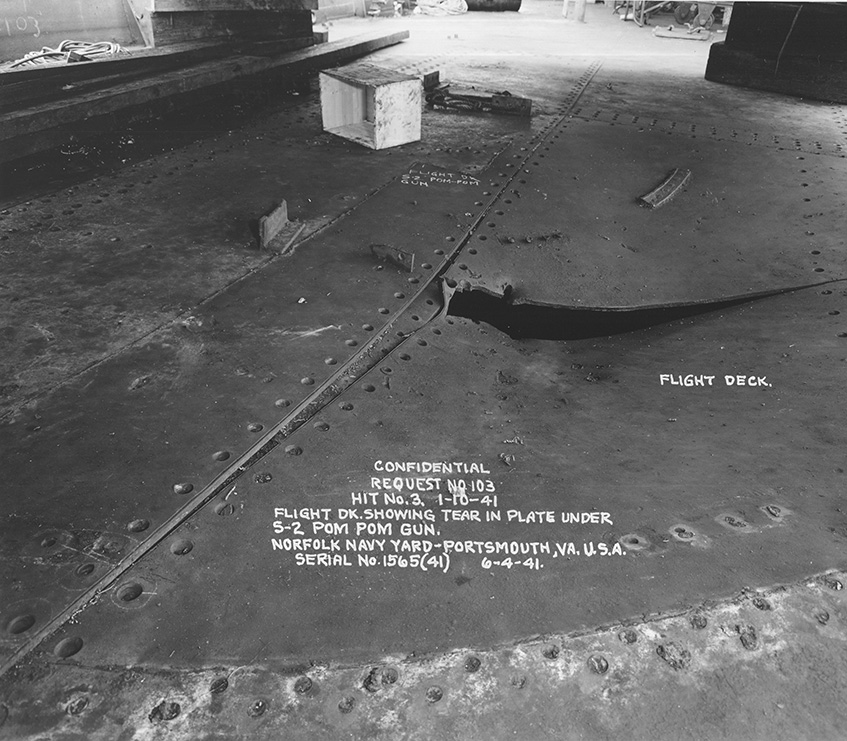
HIT NO.3 (1): 250KG (500LBS), S2 POM-POM
The Starboard 2 pom-pom had been engaged on a bearing of Green 120 when this bomb struck. It burst on contact, without perforating the reinforced (but unarmoured) deck beneath. All of its crew were killed as were most of the S1 pom-pom crew next to it.
HMS Illustrious’ Battle Damage Report classified this explosion as likely being from a smaller, contact-fused General Purpose grade bomb or Anti-Personnel bomb.
The deck beneath the pom-pom was dished by up to 9in and the protective screen blasted out of its mountings. All electrical circuits to both S1 and S2 pom-pom were severed.
Splinters from this blast passed through S1 pom-pom mount’s shield, killing several of its crew.
The gun itself was not put out of action.
The large mobile crane – “jumbo” – had been parked between the two gun shields at the time of the attack. Its arm was buckled and collapsed on top of S1 pom-pom – preventing the gun from being trained for the remainder of the action.
The S1 mount was restored to service, however, and contributed to the defence of Illustrious during the raids on Valetta Harbour.
"I returned to my action station in the hangar. The ship continued to rock and sway. I looked up with fear and apprehension. Then there was an almighty flash as a 1,000 lb (sic) bomb pierced the 4 inch (sic) armoured deck and exploded. I was only aware of a great wind, of bits of aircraft, debris, all blowing out to the forward lift shaft of 300 tons which was also blown out.
There were dead and wounded around, my overalls were blown off, I had small wounds to the back of my head and shoulder. I was probably 10-15 feet away from the bomb when it exploded. Luck I survived? I prefer the thought of someone looking out for me.
The hanger by then was burning all over. The ship’s commander came and said ‘Come on lads close the armoured doors.’ The overhead sprays then flooded the hanger. The ship started to sink by the stern and everyone had to blow up lifebelts. Then, a spot of humour in all that chaos. Poor old Corporal Gater came through a side door white as a sheet saying ‘I wish I hadn’t bloody joined.’
The battering carried on for six to seven hours.
There were many wounded piled up; the aft surgeons station had been destroyed, the forward station was unable to cope quickly with so many casualties.
Captain Boyd finally steered with the engines into Malta; the ship was quiet at last."
- Memories of the Fleet Air Arm, Richard Griffin
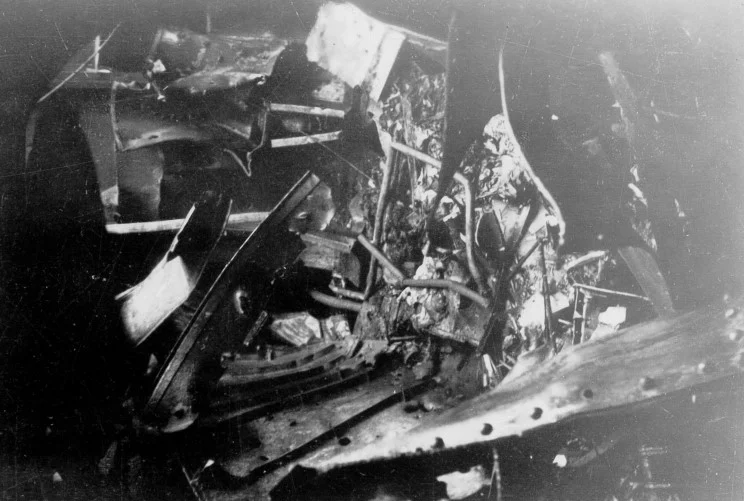
CLICK image for full-size view: Top left, the mangled aft lift is hauled out of the lift well in Malta. Centre left, the shattered lift well. Bottom left, the tangle of steel in the hangar and aft spaces. BELOW: Norfolk Navy Yard pictures of the damage done to the aft lift and lift well. Pictures courtesy 'Researcher at Large'
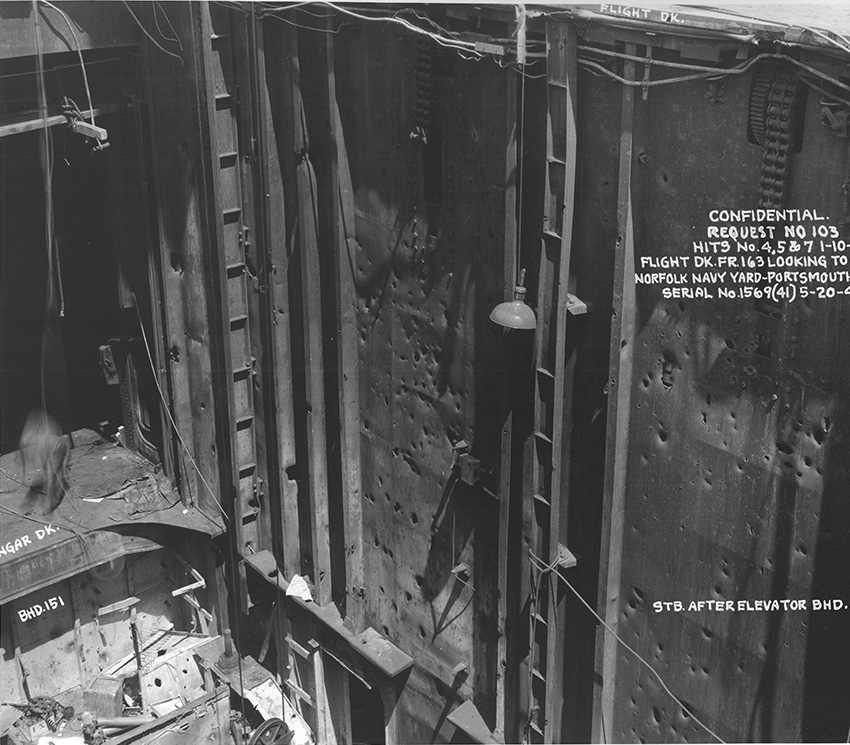
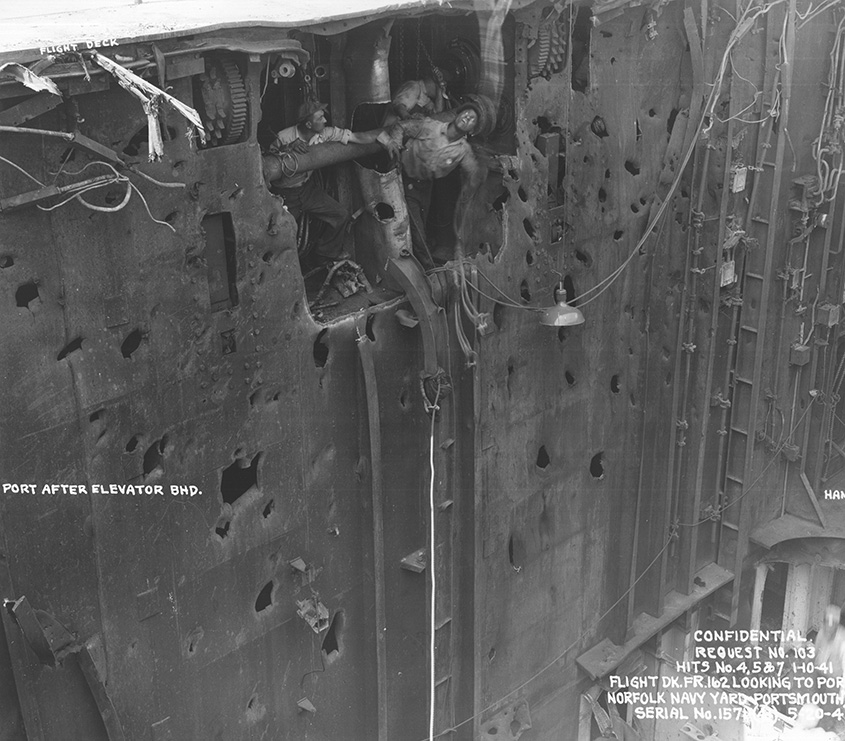
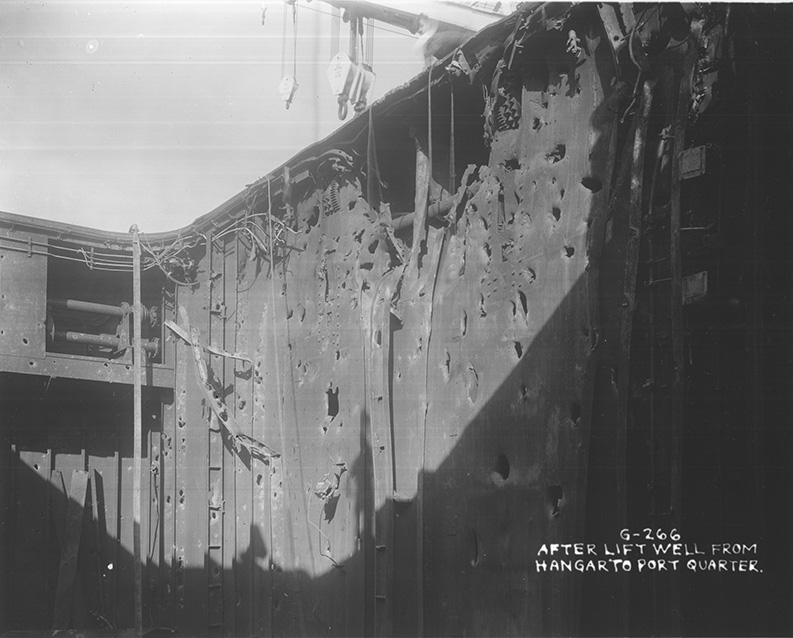
HIT NO.S 4, 5 & 7
The intensity of damage to the aft lift well prevented the assessment teams from separating the effect of individual bomb blasts. This made the estimations of bomb size and types more difficult.
Nevertheless, it was known that the first to bomb to strike the lift was responsible for destroying a Fulmar which was being transferred below on the platform at the time. The 300-tonne elevator then dropped on its side to the hangar deck below.
This and subsequent blasts started fires in the aft hangar, disabled the Y-group pump motors as well as damaging electrical cabling to all four aft 4.5in gun turrets.
These guns were put out of action.
Perforations in the lift platform itself and shell fragments found amid the wreckage helped the DNC reach the following conclusions:
HIT NO 4 (3): ABOUT 250KG (500LB). This bomb hit the top port side of the lift well or lift platform. The fuze was likely to be Direct Action (contact) type. The concussion from this blast shredded the steel roller-shutter fire curtains inside the hangar - sending metal shards ripping through aircraft, equipment and crew.
HIT NO 5 (5): 250KG (550LB) OR 500KG (1100LB). This glanced off the starboard forward corner of the after lift-well before detonating in the lower starboard-aft corner. The fuze was likely to be another Direct Action (contact) type, unless a delay fuze was initiated by contact with the lift platform or lift-well edge.
Fulmar Observer Lt
Desmond Vincent-JonesSoon we were away down the deck and starting to climb off the bow of the ship. When we had reached a few hundred feet we found ourselves surrounded by Ju87s as they were pulling out of their dives and some of them were very close, one hundred yards or so, and I could see clearly the rear gunners firing at us... I looked down and saw the poor Illustrious passing through huge columns of water, her guns blazing and a fire and smoke coming from the after end of the flight deck. The first 500kg bomb had scored a direct hit on the Fulmar which had failed to start – no sign of it or its crew was ever seen again. The bomb went on down the after lift well and exploded on the main deck killing about 30 of the maintenance crews of 806 Squadron who had been allocated the after end of the hangar. The blast went through the hangar and buckled the foremost lift, thus putting an end to any further chance of flying off other aircraft.
HIT NO 7 (7): POSSIBLY A 500KG (1100LB) OR ANOTHER 250KG (500LB) BOMB. Delivered by an Italian Stuka at a later point in the day as Illustrious limped towards Malta, this bomb's fuze also was likely to have been a Direct Action (contact) type – unless initiated by striking the edge of the lift well or a higher section of the mangled lift platform.

Bullseye ... no less than three bombs entered Illustrious' aft lift well. This picture shows the detonation point of one of these bombs high on the port side.
CLICK image for full-size view: Top left, the armoured flight deck penetration point. Centre left, the penetration in the 3in armour with a hand for scale. Bottom left, the melted splinter screen covering the 4.5in shell hoist in the wardroom flat. BELOW: Pictures of the penetration point of the 2200lb bomb on Illustrious' flight deck, the damage to the hangar deck and sides, and to one of the fire roller shutters (up at the time of the hit). Pictures courtesy 'Researcher at Large'
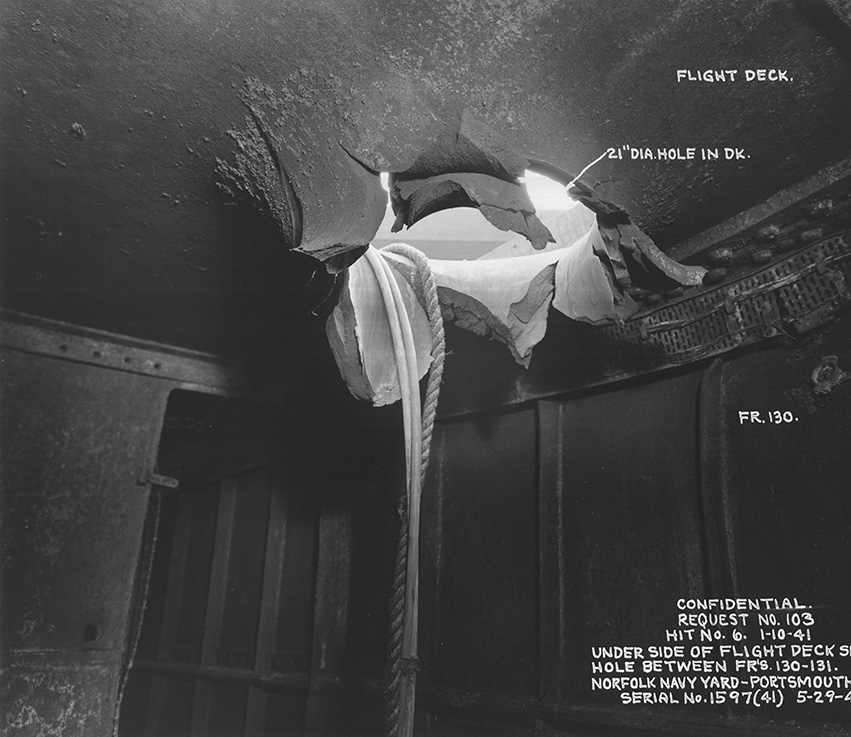
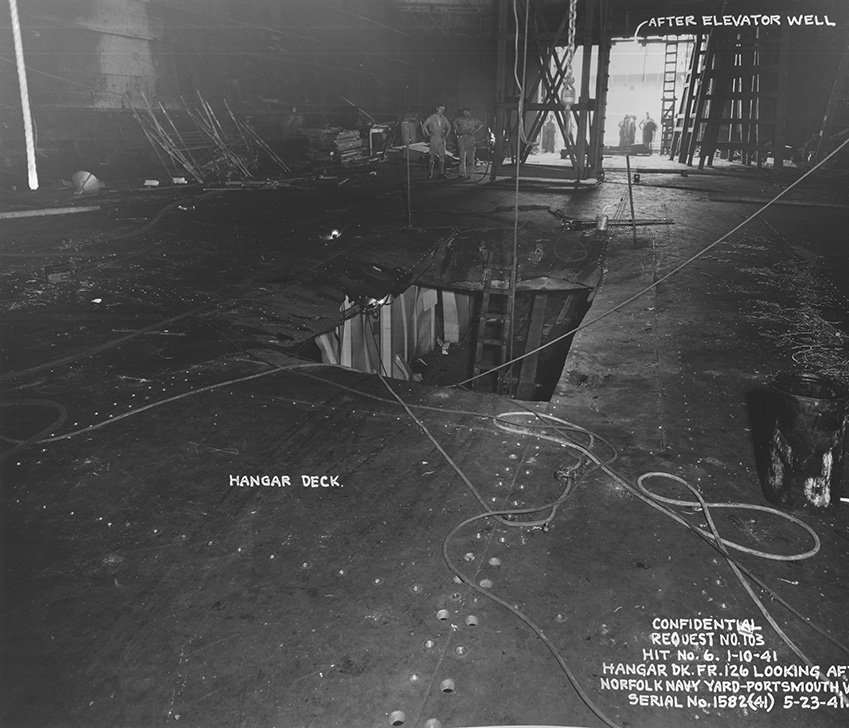
HIT NO 6 (4): 1000KG (2200LB), DECK ARMOUR PENETRATION
This heavy armour-piercing bomb punched through the flight deck and burst on hangar deck. The hit left a 19in hole in the 3in Flight Deck armour, 1ft to port of the centreline at 131 station.
Initially assessed in Illustrious's formal Damage Report (Bomb & Shell) as a 500kg (1100lb) bomb, hand-written corrections and an attached memo amended this to 1000kg (2200lbs). An independent analysis by US Naval Engineers also disagreed with the original 500kg (1100lb) assessment, stating they believed the bomb to have been an 1000kg “Esau”.
DNC would later determine that the bomb had only just managed to defeat the armour plate: The impact had not dished the 3in hardened steel and the structural joints were not seriously distorted.
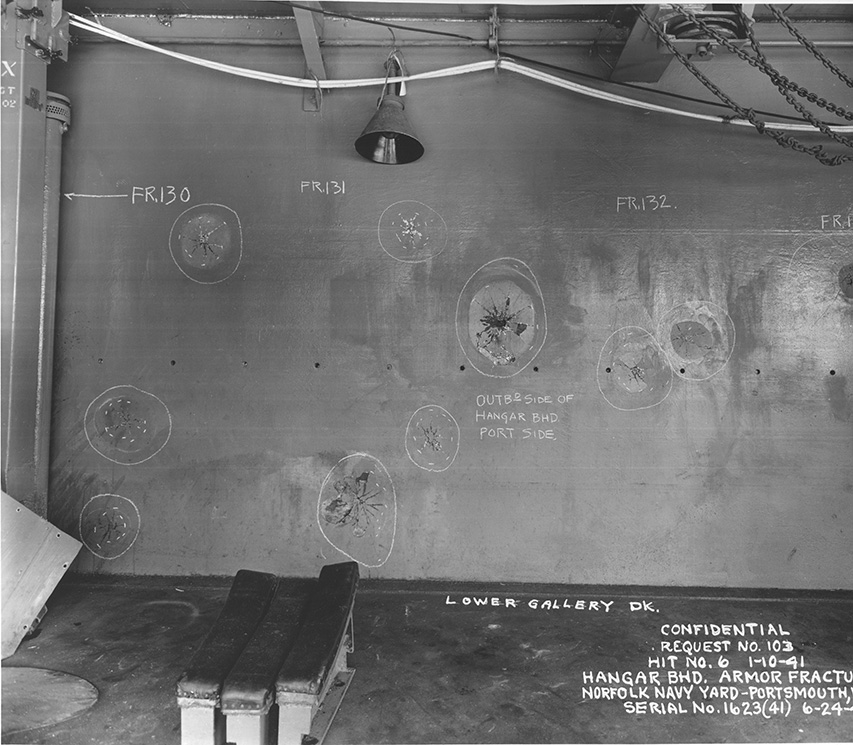
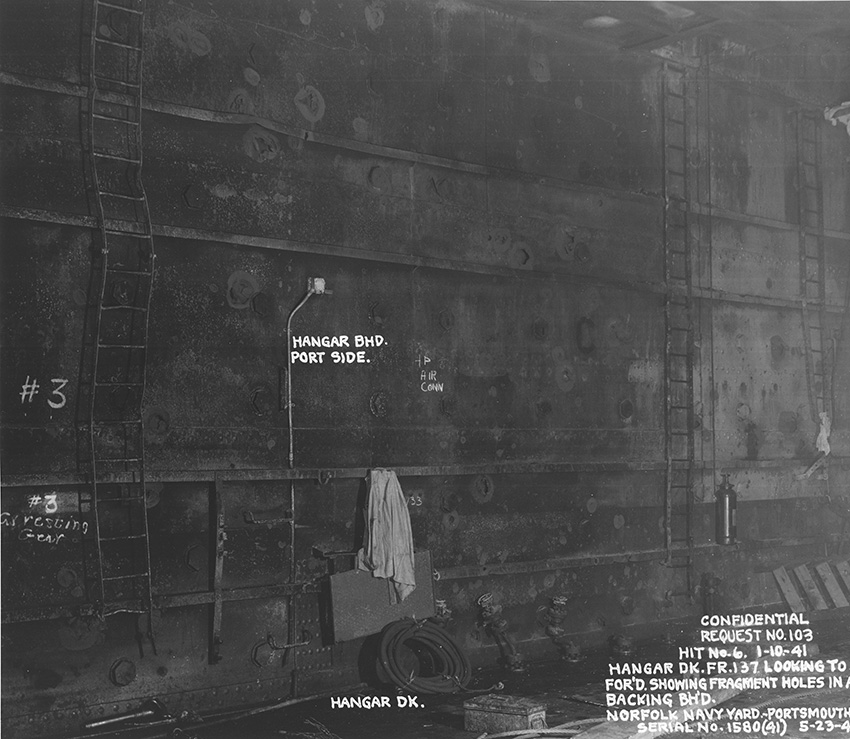
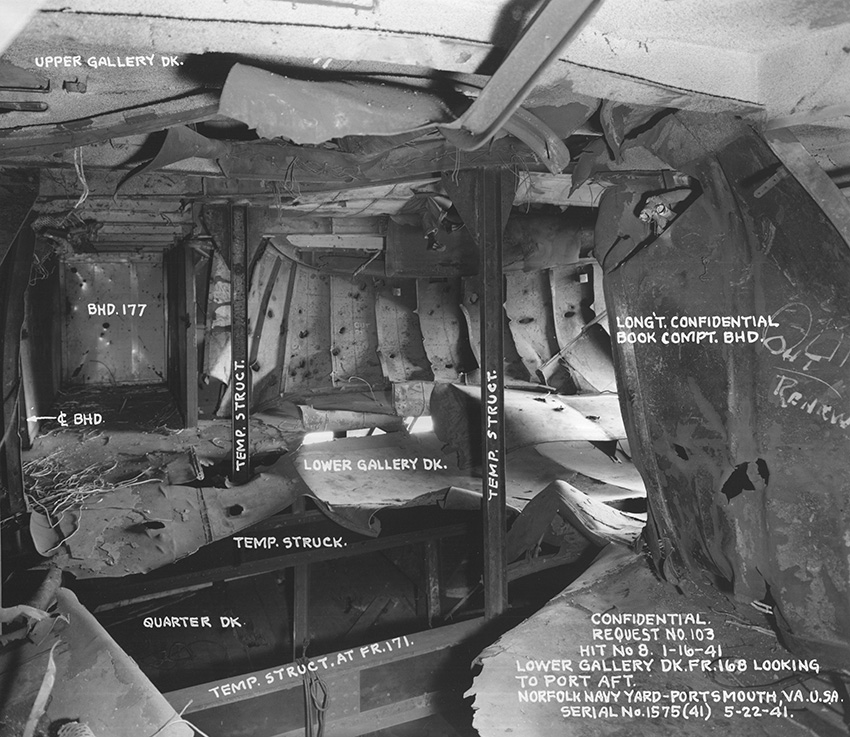
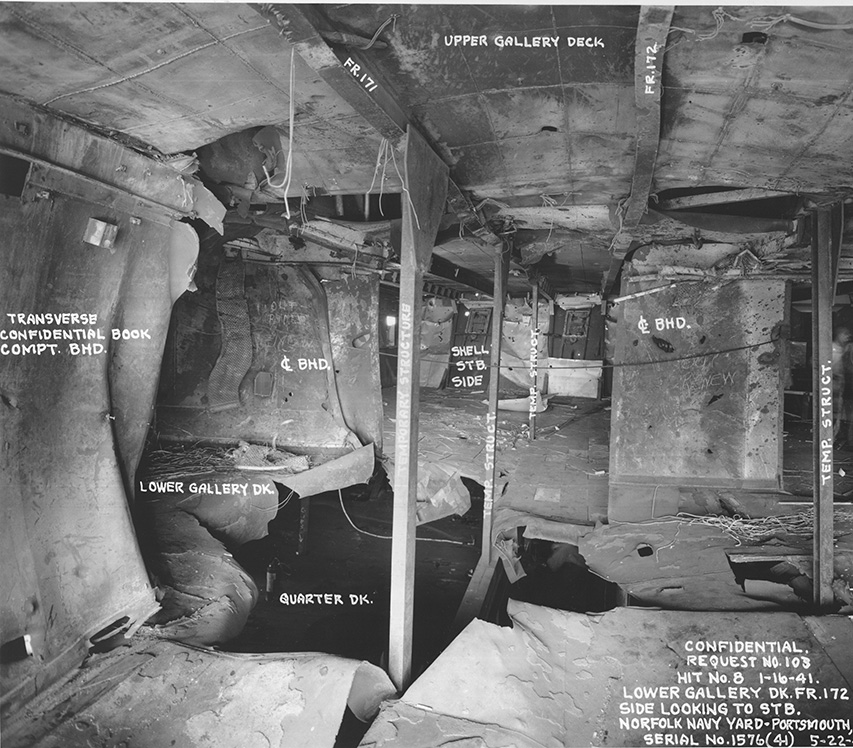
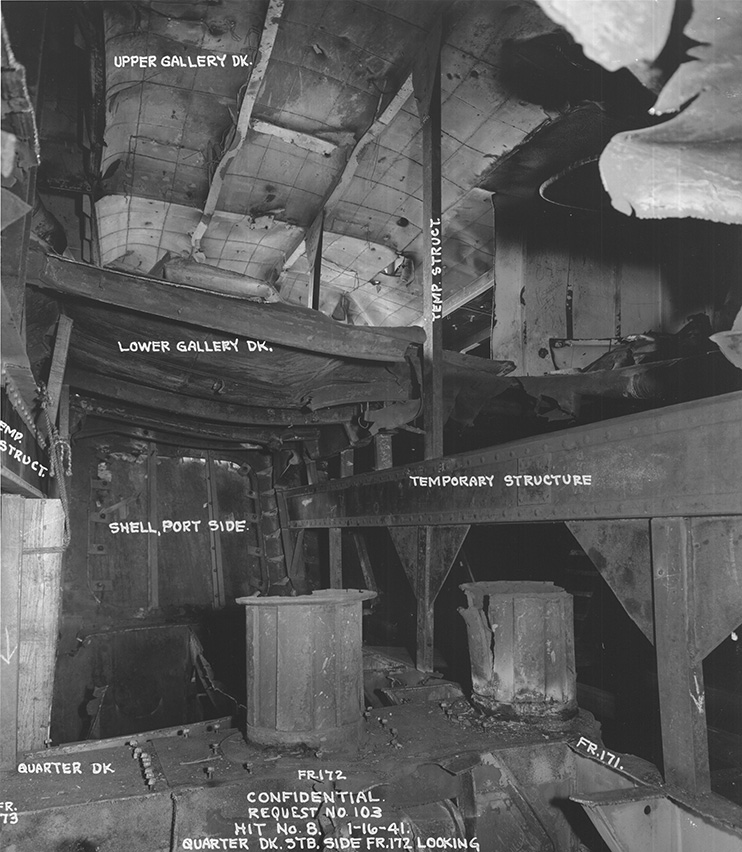
The warhead went on to burst in the hangar space just 2ft above the 1in strengthened steel hangar deck. It ripped open a 4ft wide hole in the 1in strengthened steel Hangar Deck on the centreline between 128 and 132 stations.
This blast then tore through the wardroom flat beneath and set afire the cabins abaft 156 bulkhead. It also severed the two main electrical runs feeding “X” and “Y” transmitting stations.
It was on this Upper Deck wardroom flat centreline that ammunition conveyors ran for the rear 4.5in guns. Perforated and buckled, they seized – halting the supply of shells to mounts already struggling with severed electricity supplies. While the conveyor trays were full of ammunition, it is believed the intense heat of the ensuing fires only caused one 4.5in round to detonate.
The floor of the Upper Deck beneath the Hangar Deck was also forced downwards some 4in by the detonation.
Splinters – from either the bomb or the Hangar Deck structure – were propelled down through the ship’s engine spaces and into some oil fuel tanks.
The heavy tail section of the bomb was thrust upwards, once again piercing the armoured Flight Deck, this time at 130 station – 2ft to starboard of the centreline. It is possible a splinter from this event pierced the port side of the island alongside the RDF (radar) office. It fragmented, with slithers spraying through the room before the cutting power leads supplying much of the equipment – including radar repeaters, signalling projectors and the RDF set itself.
Illustrious' Fight For Life
Kenneth PoolmanJago had dashed into a spraying room at the side of the hangar to get the sprayers working. When he got back into the hangar it was a ghastly shambles. Dead and badly wounded men lay on the deck, some hit by pieces of steel from the hangar fire-screens which had shattered to pieces and flung sharp slivers like scythe blades through the hangar. He saw an officer he knew looking straight at him. The man had no top to his head. He immediately had all access doors to the hangar closed and got the sprayers going. Ammunition was exploding all over the hangar and planes were burning. Down one side of the hangar were six swordfish with depth-charges attached, and another six armed with torpedoes.
‘Don’t worry,’ said the Gunner (T), ‘they won’t cook off.’
Then there was a blinding, staggering crash and a great (two) thousand-pounder struck the flight-deck right on the centre-line. It burst through the armoured deck and the hangar-deck below, hit the after ammunition conveyor and exploded, killing and badly wounding everybody in the wardroom flat. All the officers taking a hasty meal in the wardroom were wiped out. The whole after part of the ship went dark and dead. The fire took hold everywhere and raged through the torn and shattered compartments where men lay trapped. A smashed petrol-pipe sprayed streams of liquid flame through the dark, smoke-filled passages.
Bill Banham found that the after bulkhead door was partially open. Peering into the wardroom flat through the thick, acrid haze, he saw the flare from a burning petrol-pipe roaring like a huge blowlamp. Ammunition near the shattered conveyor started to go up. Flame suddenly appeared through the openings in the conveyor.
Click on the image for a larger view.

Devastating fires were started among the aircraft and fittings of “C” hangar (the aft third of the hangar space). Once again the metal “roller shutter” fire curtains fragmented into red-hot projectiles which cannoned through the enclosed space. The aft fire sprinkler system was also wrecked.
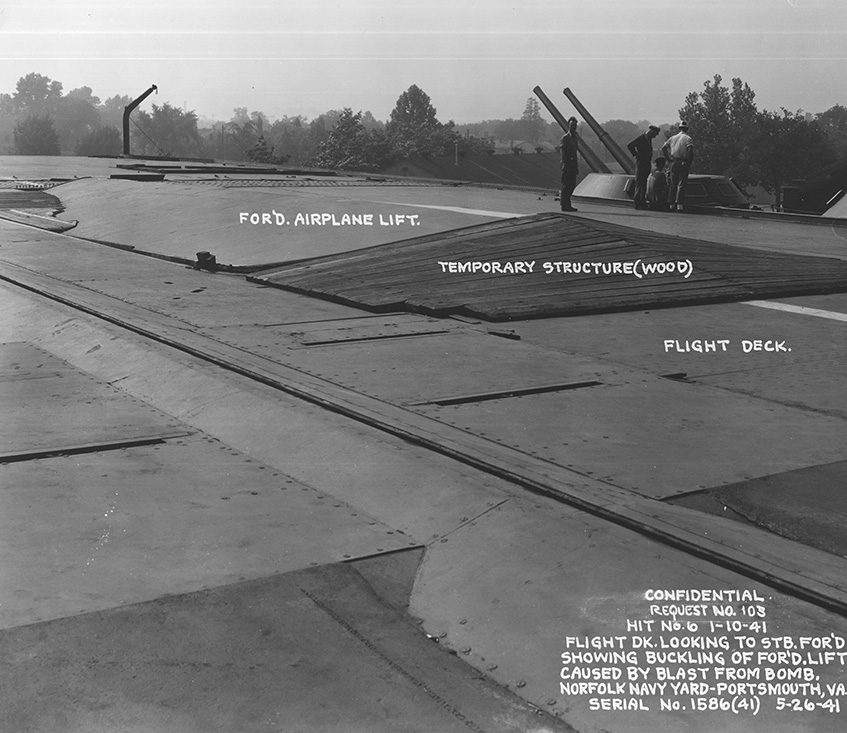
Compression from this and other blasts - but likely mostly from a near-miss - had distorted the forward lift so that it was buckled upwards some 4in on the centreline.
It was the effects of this bomb which rendered Illustrious useless as an aircraft carrier.
A preliminary hangar deck damage diagram in the US National Archive, showing the position of aircraft and the metal fire curtains. Click on the image for a larger version to display. Picture courtesy 'Researcher at Large'
The USN engineers believed this bomb to have been of an “Esau or similar” type. I’ve not yet found documentation explaining this determination.
Supplied measurements of the 3in-armoured deck penetration vary between 19 and 21 inches.

The SC1800 (General Purpose 4000lb) was deployed in limited numbers against Operation Excess. Nicknamed “Satan”, it had a recorded diameter of 26in.
The PC1000 (Armour Piercing 2200lb) had the nickname “Esau”. Its body diameter was 19.8in and warhead 160kg. But it was not listed by the X Fliegerkorps “overview” report as among the bombs used on January 10.
The SC1000 (General Purpose 2200lb) was nicknamed “Hermann” by the Germans. It came in three variants of 26in, 25.5in and 25.6in wide. Warhead weights were 620kg, 530kg and 600kg.
The SD1000 (Semi Armour Piercing 2200lb) is also a possibility. I’ve not yet found specifications for the type, though some accounts say it is designation misapplied to the PC1000. X Fliegerkorps reports having deployed more than 60 against the British convoy and its escorts that day.
The SC250 (General Purpose 550lb) is among X Fliegerkorps listed bomb loads. It was 14.5in wide with a 130kg warhead.
The SD250 (Semi Armour Piercing 550lb) had the same diameter, but a 79kg warhead. X Fliegerkorps overview report (bottom of this page) states Illustrious was hit by two of these bombs. But that same report’s Appendix summary did not list the SD250 as among those deployed.
LUFTWAFFE BOMBS
AND DESIGNATIONSThe Luftwaffe was equipped with standardised categories of bombs.
These were designated SC, SD and PC. This was used as a prefix, followed by a number which represented their weight in kilograms. A third “tag” could be applied to designate the type of fuse fitted: For example, mV (mit Verzgerung) was a short delay action, LZZ (LangZeitZnder) was a long delay fuse.
Sprengbombe Cylmdnsch (SC): Thin-walled free-fall high-explosive bombs. These were “general purpose” or “burster” bombs, intended to produce maximum blast effect against lightly protected targets. Denoted by a yellow stripe on the tail cone.
Sprengbombe Dickwandig (SD): Medium-cased semi-armour piercing fragmentation bombs. These were available in 50, 70, 250, 500 and 1700 kg versions. Their penetration abilities make them useful against ships, harbours and fortified positions. Denoted by a red stripe on the tail cone.
Panzersprengbombe Cylmdnsch (PC): Extra-thick hardened-steel walled armour-piercing bombs. These were available only in 500, 1000 and 1400kg versions. Their specific purpose was to attack shipping and fortifications. Denoted by a blue stripe on the tail cone.
Many of the bombs were given nicknames – though these often seem confused. For example, the term “Esau” applies to the PC variant which is often incorrectly termed the SD1000. The “Herman” was the SC variant.
The common SD500 bomb does not appear to have had a nickname.

Overview: Hangar
Illustrious’ War Damage Report lists the hangar as holding nine Swordfish and four Fulmars at the time of the attack. The Swordfish were armed with either SAP or anti-submarine bombs while six torpedoes were stored in readiness for any rapid-response strike force.
Three of the four metal fire-curtains were down. Only that at frame 78.5 was likely to have still been up. These fragmented and were sent flying through the hangar when the bombs burst in the aft lift-well and the heavy 2200lb bomb penetrated into “C” hangar.
Among those killed by this shrapnel were men positioned to access the emergency controls for the hangar-fire sprayers.

This unfortunately blurry photo of a page from HMS Illustrious' Captain's Proceedings Report for the action shows the positions of the aircraft in the hangar at the time of the attack. "S" stands for Swordfish, "St" stands for Swordfish armed with a torpedo, "t" represents the position of 'action ready' torpedo reserves and "F" locates the Fulmars.
Only “B” hangar’s sprayers were immediately activated. “C” hangar’s spray controller was dead, and the starboard control valves were later found to have been jammed. The port control valves were able to be opened half-way before the heat from the fire forced the damage control team to retreat.
Later it was found the “C” hangar salt-water ring main had been pierced and the sprayers were unlikely to have operated at all.
In “A” hangar, while there was no visible fire, the space was filled with smoke. The sprayers were activated over the Swordfish there as a precaution.
Letter from Commander-in-Chief, Mediterranean
to Secretary of Admiralty
[ADM 267/ 83] 27 February 1941AIR ATTACKS ON HMS ILLUSTRIOUS, 10 January 1941
Forwarded for the information of Their Lordships, concurring with the remarks of the Rear-Admiral, Mediterranean Aircraft Carriers.
(2) The circumstances surrounding these attacks on H.M.S. ILLUSTRIOUS will be recorded separately in the report of Operation M.C. 4, of which this episode formed a part.
(3) There can be no doubt that the German Air Force operating from Sicily made a most strenuous effort to destroy ILLUSTRIOUS. The dive bombing attacks on her, WARSPITE and VALIANT, were pressed home with great determination and were brilliantly executed.
(4) It was very unfortunate that the 6 fighters up were not over the Fleet at the time for the reasons given in ILLUSTRIOUS’ report. Had they been, the results might have been very different. However, they were able to intervene with effect later on.
(5) The apparent effect of the A.A. gunfire of the Fleet was disappointing and the fire discipline of the short range weapons was not good. This matter is receiving urgent attention. The need for realistic dive bomber targets for practices is very evident...
(7) I concur with the Rear-Admiral, Mediterranean Aircraft Carriers, that the bearing of the Officers and men of H.M.S. ILLUSTRIOUS under the stress of these attacks and subsequently was exemplary and in accordance with the highest traditions of the Service.
(8) A separate report regarding damage in H.M.S. ILLUSTRIOUS and damage control will be forwarded in due course.

This picture shows the hole in Illustrious' 1in hangar deck and the wrecked ammunition conveyor and Wardroom passage below.
Damage control teams struggled to clear the debris of the wrecked forward fire curtain in order to close the forward armoured doors. They knew the draft of air through the buckled lift platform was fanning the fires behind them. But the heavy doors would only half-close due to distortions in the deck.
The four Fulmars in “C” hangar were reported to be well alight, as were the stores stashed in the overheads. These would not be extinguished until 0200 the following morning. But “B” and “A” hangars remained free from fire – partly because of the sprayers and because of the separation between the burning Fulmars.
Nevertheless, the flames, smoke and heat forced the whole hangar to be evacuated. Small teams would dash in to complete a specific task before quickly retreating once again for fresh air and relief.
Water from the hoses and sprays was pooling deep and flooding through the hole in the hangar deck into the wardroom flat below. This weight gave the ship a “considerable” list to starboard and caused some concern for the carrier’s stability.

Eventually, damage control teams hacked a hole in the starboard-aft exhaust fan ducting in the side of the hangar which allowed the water to flow out and over the side.
Once the hangar was secured and left to cool, assessment teams took stock of the damage.
The four Fulmars were burnt out. Five Swordfish were written off, but four remained in a repairable condition.
Most notably, none of the bombs or torpedoes in the hangar space had exploded. All remained “safe”. Only boxes and belts of ready-to-used .303 ammunition had “cooked off”.

A view through the hole in the 1in Hangar Deck showing the holes in the Upper Deck (Wardroom Flat) below to the Link Trainer Compartment.
OVERVIEW: ENGINE AND BOILER ROOMS

Shielded by the armoured flight deck, hangar deck, armoured hangar walls and armoured belt, Illustrious’ engine spaces had comparatively little trouble.
While the ship’s list caused some nervous moments, along with fuel contamination and occasional electrical “flickers”, the machinery continued to run smoothly.
But life was hell for the crew.
By 1250 all three boiler rooms had reported thick black smoke and chemical fumes were pouring down the ventilation shafts.
Despite the conditions rapidly becoming untenable, the Senior Engineer ordered that the boilers must be kept operational at all costs.
Crew members wrapped wet rags around their mouths and doused themselves with feed water from the auxiliary pumps
Some found breathing apparatus and returned to their stations while others found ways to block or divert ventilation ducts.
After an hour-and-a-half of these conditions, crew began to request the boiler rooms be evacuated. The Senior Engineer insisted they must stay at their posts.

German officers point at the tailplane of a Ju88 carrying the outline of a British aircraft carrier. The picture was likely taken in March 1941, after HMS Illustrious had been hit - but also after several claimed hits against HMS Formidable.
There they remained, without relief, as the off-duty stokers and machinists were active in the firefighting parties and damage control teams also struggling to save the ship.
In the evaporator rooms, one of the watchkeepers was overcome by the heat and had to be dragged to safety. A replacement would then dash into the room on regular intervals to check the equipment was running correctly.
The War Damage Report reads:
“The courage and devotion to duty of the boiler room crews of the afternoon watch was magnificent and was a large factor in the ship’s safe arrival in harbour.”
Overview: Rudder & Quarter Deck
With the first bomb hits about 1240, half the lights suddenly went out in the machinery control room. The starboard boiler room rapidly lost steam pressure and several electrical pumps failed.
The control lights to the electric steering motor control board also blinked off.
While the pumps were successfully restarted, the steering gear quickly failed again. By 1303 the ship was being controlled by a steam steering engine.
Attempts to contact the tiller flat failed. The intense fires in the aft cabins and tangled steel from the bomb hits in the aft lift-well prevented any attempts to send damage control teams in to take a look.
It was later discovered that the tiller watchkeeper had been killed and the flat itself flooded.
During the high-level bombing attack of 1330, the steam engine powering the rudder failed about the same time as a near-miss was reported. Control was restored momentarily at 1348, but a serious oil leak in the steam mechanism became evident. It also appeared the fire under the quarter deck was being fed by this leaking oil, so the Senior Engineer requested permission to shut the system down. The Captain agreed. Illustrious would be steered by engines only.
By 1435, the carrier was back under control and steaming towards Malta.
When docked Illustrious was found to be down about 5ft by the stern. She had been completely flooded aft of 151 station, with “numerous underwater holes”. Plugging these punctures and pumping out the water would take several days.
Malta’s dockyard report read:
“But it was not until the evening of Wednesday 15th January that it was possible to reach the Tiller Flat. It was then found that the failure of the Electric steering gear was entirely due to flooding, there being no mechanical defects, and that a solenoid valve had jambed open thus allowing an escape of oil from the system which eventually caused the failure of the steam steering gear."
A thick tangle of burnt and distorted steel had to be cut away before Malta's dockyard workers and Illustrious' engineers could examine the condition of the disabled rudder machinery.
Bomb sizes
The weight, size and type of bombs used against Illustrious is a contentious topic. Officers and crew in the heat of action classified bombs as either 500lb or 1000lb based on how big they seemed as they fell from attacking aircraft, and the size of the plume of water expelled in a near-miss.
After the action, in Malta, efforts were focussed on preparing the ship to escape to Alexandria. And it was only when Illustrious was at Norfolk in the United States that naval architects and engineers were able to undertake a forensic analysis and compare this - to the best of their knowledge at the time - of what German bomb types were available.
A late addendum to the official battle damage document (linked on the main site) changes the assessed weight of the bomb that penetrated the 3in deck armour of Illustrious from 1100lbs (500kg) to 2200lbs (1000kg). This was reportedly upon the advice of US naval engineers.
That assessment was repeated in US naval documentation, including the intelligence summary War Damage to British Naval Vessels, Summary of Damage by Bombs to September 2, 1941.
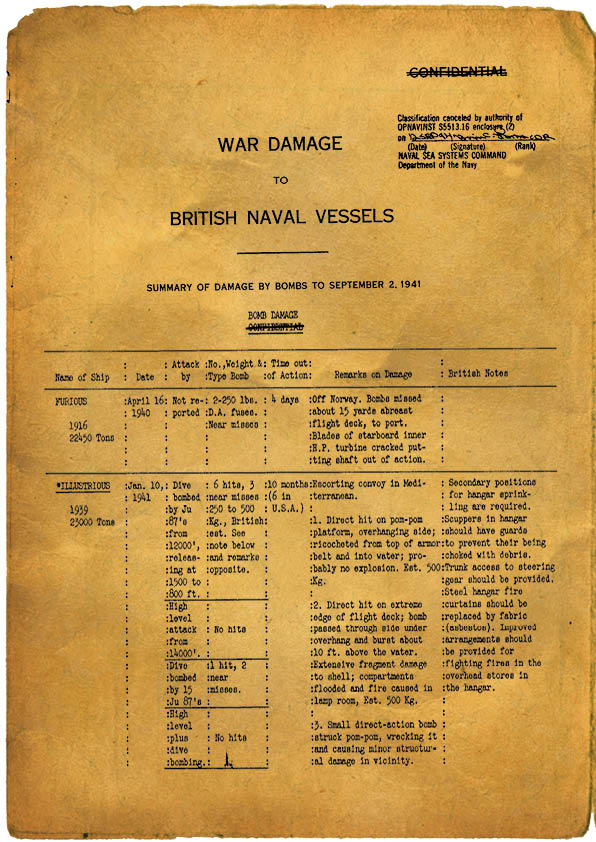
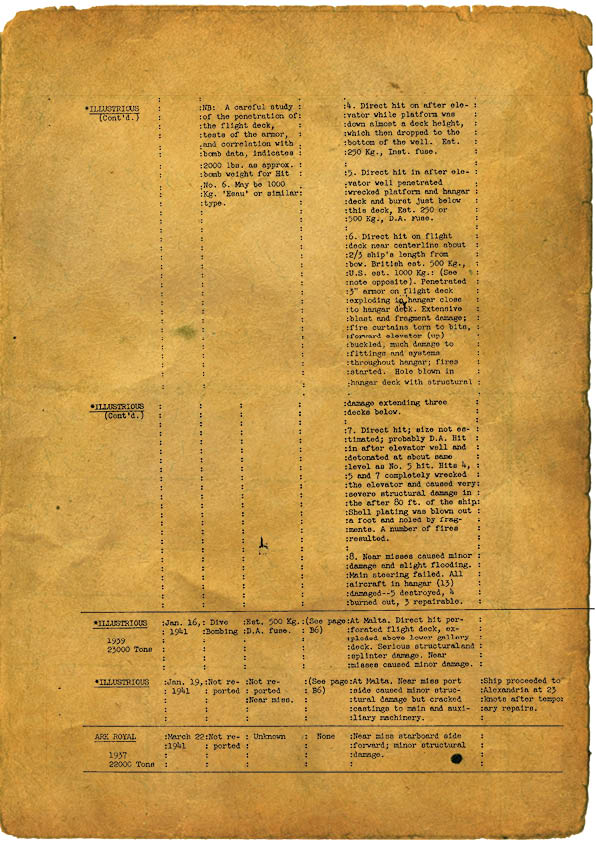
CLICK here for the original PDF: War Damage to British Naval Vessels - Summary of Damage by Bombs to September 2, 1941
The squadron records of X Fliegerkorps for the period appear to have been lost, destroyed or mis-archived. But summaries of its operations can be found in Luftwaffe Intelligence overview documents.
Below: Extract from German Documents in Russia: Lageberichte West des Führungsstabes der Luftwaffe (Operational reports from the Air Force operations command headquarters for the Western theatre. ) This document was drawn to my attention by Eugen Pinak.


TRANSLATION:
MEDITERRANEAN (X. Flieger-Corps):
On January 10th Reconnaissance in western Malta identified a ship formation that consisted of 2 battleships, 2-3 heavy cruisers, 1 aircraft carrier, 6-8 merchant ships and 12-15 destroyers and was heading east t east-southeast towards Malta.
Between 1240 and 1805pm, combat and dive-bombing units launched in five missions under fighter protection attacked this ship formation with 3 SC1800s (1800kg/4000lb High Explosive), 9 SC1000 (1000kg/2200lb High Explosive), 61 SD1000 (1000kg/2200lb Semi-armour piercing) and a large number of SC250s (250kg/500lb High Explosive) and scored hits.
1 SC 1000 on the forecastle of the aircraft carrier
2 SD 250 on the stern of the aircraft carrier
1 SD 250 on a destroyer
More hits:
According to reports from the fighter escort, 2 SD 1000s hit the aircraft carrier and there were bomb hits on other, unspecified ships in the formation.
Apart from a weak but long-lasting smoke emission after a hit on the aircraft carrier, no immediate effects were obseved.
In total, the following were used:
7 reconnaissance aircraft
92 strike aircraft
34 fighters
133 aircraft in which 3 aircraft (Ju87) were lost.
For further details, see Appendix 5
THE ACTIVITIES OF FLIEGERKORPS X IN THE MEDITERRANEAN
JANUARY - FEBRUARY 1941
EXTRACT FROM THE OPERATIONAL ORDERS AND COMBAT RESULTS OF FLIEGERKORPS X
Attacks on the Aircraft Carrier '’Illustrious' -
First attack - One direct hit by St.G.3. with SD25O bomb with 28a fuze, and a possible hit by St.G.3 with one SD1000 bomb with 35 fuze; also a possible hit by KG 26 with one SD1000 bomb with 35 fuze. After this attack the carrier docked in La Valetta (Malta).
Editor’s Note
SC (SPRENGCYLINDRISCH) = M.C. (Medium Capacity)
SD (SPRENGDICKEWAND) - S.A.P. (Semi Armour Piercing)
Second attack 6.1.41. - In La Valetta. St.G.3. scored hits with one SD1000 'bomb (35 fuze) and three SC500 bombs with 28b fuzes, and LG 1 with 2 SC1000 bombs with 28b fuzes. It was estimated that these fell between the Carrier and the quayside.
Third attack 19.1.41. - In La Valetta, St.G.3. attacked with 5 SC5OO bombs with 28b fuze and 5 SD500 bombs with 28a fuze. After this attack, thick columns of smoke were observed. Subsequent photographic reconnaissance showed severe damage on the upper deck (landing deck) of the carrier, and the fact that shadows cast were short indicated that she was lying low in the water, and it was therefore assumed that she was aground,
A few days later the Illustrious was sighted once more, this time in Alexandria, which she was thought to have reached under her own power. This failure caused great disappointment in Fliegerkorps X. These poor results were generally thought to be due to some special protection around the Carrier's engines and her main installations, rendering the blast of the bombs ineffective. The SC1000 bombs which fell between the Carrier and the Quayside probably damaged the ship’s hull, but as she was no doubt equipped with strong bulkheads, she could keep afloat in spite of being partly flooded and lying low in the water (as seen from the shorter shadow cast).
Document supplied by Eugen Pinak


MORE ON ILLUSTRIOUS