The Royal Navy’s first armoured carrier had been active a mere six months when her design and construction was put to the ultimate test.
Admiral Cunningham had taken a risk to place the newest and most powerful unit in his fleet so close to the enemy in the Sicilian Narrows. But he felt HMS Illustrious offered vital air cover and an equally important boost in morale.

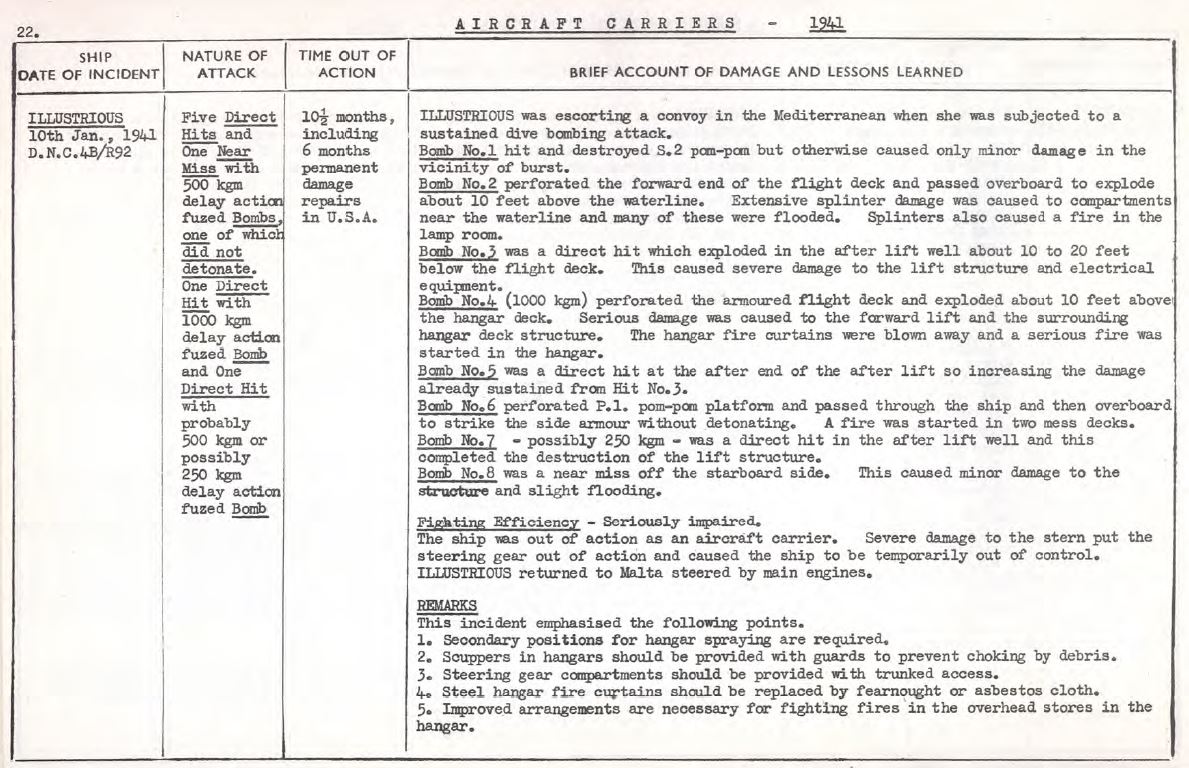
Course of action ... a map showing the proximity of the convoys to Sicily and HMS Illustrious' track back to Malta after being damaged on January 10.

HMS Illustrious wore this MS4a pattern applied over the previous overall B6 at the time of the January 10 1941 attack. While the pattern was very similar on both sides, the port side appears to have incorporated more curves. The deck was 507a and the markings dull yellow. By January 10 the broken flight deck centre line had been painted into a solid stripe. I have seen no evidence that the forward round-down of the flight deck was ever painted yellow. Source: British and Commonwealth Warship Camouflage of WWII, Volume 2, Battleships and Aircraft Carriers, by Malcolm Wright

HMS Illustrious was part of Force A – the core of a covering force for a complex “rush” of convoys through the Mediterranean’s chokepoints in January 1941 called Operation Excess. Admiral Cunningham was Commander in Chief of the operation from his flagship HMS Valiant.
Cunningham was feeling supremely confident after Illustrious’ success at Taranto. It was a strategic victory he was determined to exploit to the full. Passage of merchant vessels through the centre of the Mediterranean to relieve Alexandria, Greece and Malta was now possible.
He fully intended to do so.
There was also a sense of urgency.
The opportunity to rush supplies through the Skerki Channel would not remain for long.
Cunningham knew Germany was about to send Italy reinforcements in the form of troops, tanks and aircraft And the vulnerable supply-lines passing just to the south of Sicily would be an obvious first target.
But he was supremely confident.
He had in his fleet two of the most modern vessels in the Royal Navy. The brand-new HMS Illustrious and the rebuilt HMS Valiant both had the new invention of radar installed and among the best and biggest anti-aircraft armaments yet to go to sea.
Not everybody was happy with Cunningham’s move.
Senior Observer Lt Desmond Vincent-Jones, the temporary squadron leader of 805 Squadron, related the mood aboard Illustrious:
“Illustrious was stationed between the two battleships Warspite and Valiant. The Admiral may have had his reasons but we in Illustrious felt it would have been tactically sounder if the carrier had been detached to act independently and at speed some 20 to 30 miles to the southward of the main fleet, thus keeping us further from the air threat in Sicily. The fighter CAP could be maintained over the fleet from a range of 20 miles with little greater difficulty than if the carrier were in company.”
It was a point both Captain Boyd and Vice-Admiral Lyster aboard Illustrious had already raised with Admiral Cunningham.
But Cunningham wanted the now-famous carrier to have pride of place among his battleships as a “morale booster” for the crews of the fleet and merchant vessels.
Allied Order of Battle

First to fight ... Admiral Sir Andrew Browne Cunningham had a supreme sense of confidence in the capability of his armoured carriers.
Force A included Illustrious, Valiant, Warspite and seven destroyers.
Force B comprised the cruisers HMS Gloucester, Southampton, Ilex and two destroyers carrying 500 troops to Malta before joining convoy MC4 as escort.
Force C was the screen for MC5, the anti-aircraft cruiser HMS Calcutta and two destroyers.
Force D was a covering force made up of the heavy cruiser HMS York and the cruisers Orion, Ajax and HMAS Perth with four corvettes.
Force F was MC4’s close escort of four fleet destroyers and the new anti-aircraft cruiser HMS Bonaventure.
Force H was responsible for MC4 for the leg between Malta and Gibraltar. It was made up of HMS Ark Royal, Malaya, Renown, Sheffield, and five “F” class destroyers.
Convoy MC4’s nine freighters were to travel to Alexandria from Gibraltar.
Convoy MC5’s two freighters were to dash to Malta from Alexandria.
It was a well-planned operation. But there was an equally well-planned response from Germany’s specialist anti-shipping unit, X Fliegerkorps, which had recently reinforced Italy’s struggling Regia Aeronautica.


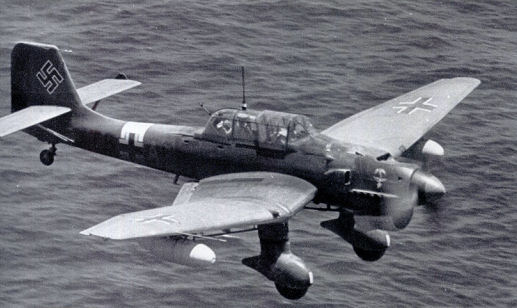
St.G 2 Ju 87 B as flown by Major Walter Enneccerus for the raid on the British carrier "HMS Illustrious". Source: Jean Barby's Luftwaffe models blog.
Axis Order of Battle
Italy’s 96 Gruppo
This bomber group detached some Ju87Rs to Sicily on January 8 after German and Italian intelligence operative reported the impending arrival of HMS Illustrious in waters off Sicily. The Stukas were to be based in Comiso. On the same day, the first of Germany’s powerful bomber contingent would arrive on the island to support the attack.Fliegerkorps X
This was Hitler’s gift to the embattled Mussolini. The specialist anti-shipping unit would have as its first priority the neutralisation of Malta and the British fleet. This would secure the sea lanes to Libya which would allow the embattled Italian army to be reinforced by German troops and armour.
The Germans would set up their headquarters in the Hotel Domenico in Taormina.
Some 96 bombers would be in position by January 8. The key element would be the 54 Ju87Bs and Rs of I/SGI and II/SG2.
They would be supported by 32 He111’s of II/KG26.
The RAF’s wireless interception intelligence service had reported that the first four Ju 88s of LG 1 arrived at Catania, on the eastern coast of Sicily, by the evening of 26 December 1940. The remaining Ju88s of II and III/LG1 would be tracked trickling through Italy during the next two weeks. Only a handful were operational on January 10
The fighters were also just arriving – including the 24 Bf110’s of III/ZG26.
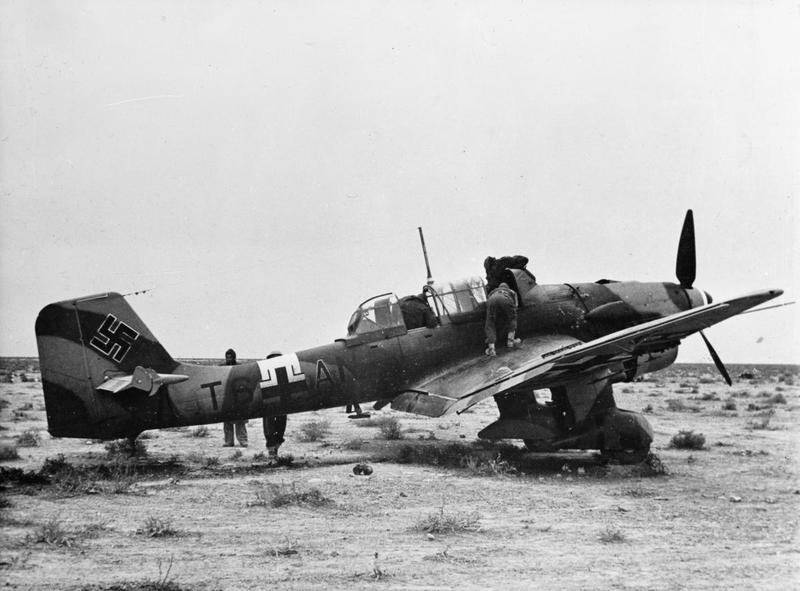
British troops inspect a Junkers Ju 87 Stuka which made an emergency landing in the desert, December 1941.
X Fliegerkorps
X Fliegerkorps was sent to Italy "for a limited period only" by Adolf Hitler to assist the struggling Italians.
It was not a half-hearted effort.
The unit was highly trained in anti-shipping operations, with many of its pilots originally earmarked to fly on Germany's first carrier, Graf Zeppelin.
Some 42 Ju87s of StGI, StG2 and StG3 had been assigned to an air base at Trapani, on the north-west coast of Sicily. Their role was to attack British ships passing between Sicily and North Africa. Specifically, that shipping meant HMS Illustrious and Ark Royal.
The units had already gained a reputation for pinpoint accuracy. And that accuracy was now to be put the the ultimate test.
The order issued by Oberstleutnant Karl Christ, Kommodore of the Stukagruppen, was straight and to the point:
"Illustrious mussen sinken!
The Illustrious has got to be sunk!"
Considerable thought had been put into how to kill a British armoured carrier, in particular by Oberst Harlinghausen and General de Flieger Geisler.
It was believed four direct bomb hits would be needed to sink the ship. No other warship had ever been delivered such a blow, but, then, these armoured carriers were anticipated to be tough nuts to crack.
The Stuka crews were confident they could do the job. Afterall, the 6500sq/m flight deck was an expansive target area. To make sure, the crews practiced their dive-bombing techniques over an outline of the carrier's shape marked by buoys in the sea not far from their new base.
The 43 Ju87 Stukas were made up of "B" models from II/StG 2 (led by Major Enneccerus) and "R"models from I/StG 1 (led by Hauptmann Hozzel).
The "R" or long range model was capable of carrying a 1100lb (500kg) bomb - but only if it was not carrying drop tanks. If a drop tank was fitted, its bomb load was limited to a 550lb (250kg) bomb.
The "B-2" could carry a 2200lb (1000kg) bomb over short distances - but only if the gunner was left behind. It was not capable of being fitted with drop tanks in any configuration.
The attack was carefully choreographed. It was no accident that Italian torpedo-bombers attacked when they did, drawing off the Fulmar patrol. And the diversionary effect of 10 Stukas attacking the battleships was expected.
When Illustrious was left to defend herself with her high-angle armament - and the fresh Fulmars observed to just be leaving her deck - it was the perfect outcome for a meticulously planned operation.
THE ACTIVITIES OF FLIEGERKORPS X IN THE MEDITERRANEAN
JANUARY - FEBRUARY 1941
TRANSLATED BY:
A.H.B.6., AIR MINISTRY
15th NOVEMBER 1947
PRIMARY COMMITMENTS
The primary commitments were the cutting of the sea route between Sicily and Africa, the disruption of British naval traffic, attacks on the British Fleet in Alexandria, and mining of the Suez Canal and British ports.
ADDITIONAL TASKS
These included attacks on airfields in.Malta and Nox’th Africa, and also on troop movements in Africa,
OPERATIONAL AERODROMES AND HOLDING BASES OF FLIEGERKROPS X
Catania:
H.Q. of X Fl. Korps
Stab/LG 1 (Ju88 A5)
II/LG 1
III/LG 1
1./F/121 (Ju88 F)
III/KG zbV 1 (Ju52)
Palermo:
III/Z.G. 26
Trapani:
Stab/St.G.3.
I/St.G.1. (Ju 87 R 1 u. 2)
II/St.G.2
Gola:
7./J.G. 26
1./N.J.G. 3
Comiso:
II/KG 26 (He111)
2./KG 4
ARMAMENT
The following were available :-
Bombs: SD50, SC250 (J A, L, K) SD250 II, SC500 L 2, SD500, SC1000, SD1000, SC1800
Fuzes: 15, 25, 25a, 28a, 28b, 35 and 17a, 38, 40, 50
The supply of bombs was adequate for the primary tasks, a certain number of SD 50 and SC and SD 250, as well as a larger amount of bombs of greater calibre, being available. There were difficulties in transporting bombs from Germany, due to congestion in the Brenner Pass. Consequently, it became necessary to use more and more SC and SD 500, as well as smaller calibre bombs, on live targets in Africa.
The type of fuses and bombs to be used by the Squadrons was laid down by Fliegerkorps X, according to the type of target to be’attacked. This frequently necessitated the changing of the fuzes in the bombs.
Document supplied by Eugen Pinak


CLICK on the image above to be taken to the original PDF
Prelude
Luck had not been with the operation from the outset.
Force A had been spotted by Italian reconnaissance aircraft as early as the morning of January 7. A reconnaissance bomber was sighted shortly after 0800. A section of Fulmars had been kept ready on Illustrious’ deck for just such an eventuality.
The fighters failed to intercept. It would not be the last time their low rate of climb would fail the fleet.
On January 9, convoy MC4 and Force H were also spotted by Italian aircraft. Ten SM79s were launched from Sardinia but were chased off by HMS Ark Royals’ Fulmars. Two were claimed shot down. A second attack by 15 Fiat CR42s also proved unsuccessful.
Force A had been strengthened by the four cruisers of Force D and HMAS Sydney. Their stay would be short: all would be detached to help cover the convoys before the attack on HMS Illustrious unfolded.
Force H handed responsibility for convoy MC4, which had been joined by Force B, to Force A at dusk.
Illustrious was carrying a squadron of 12 Fulmars (806 squadron), along with a detachment of three Fulmars from 805 Squadron. This was regarded as the standard fighter complement for the fleet carriers.
There also was some 20 Swordfish (in 815 and 819 squadron). These stoic biplanes were running anti-submarine and spotting patrols around the convoys.
January 10

Tired and torn ... the wreck of HMS Gallant in Malta harbour. The ship was judged to be a total loss and her remaining guns and equipment were stripped to help defend the beleaguered island.
Early on January 10, two Italian torpedo boats and a submarine launched attacks on MC4. The anti-aircraft cruiser HMS Bonaventure and two destroyers which had been with the convoy gave chase – sinking the torpedo boat Vega.
However, one of HMS Illustrious' escorts - the destroyer Gallant - struck a mine at 0835. Another destroyer took her in tow, and a third destroyer was detached as escort along with Bonaventure.
Illustrious’ radar was to play a key role in the air battle as it unfolded. The Type 79Z model she was fitted with was capable of detecting aircraft at 20,000ft up to 90 miles away.
The Fulmars – of which 12 were operational - were providing the combat air patrol. Three had become unserviceable through accident or mechanical fault.
The air battle began at 0930 that morning when one of HMS Illustrious’ Fulmars shot down an Italian reconnaissance aircraft. Most of the early radar contacts turned out to be aircraft attempting to shadow the fleet.
Five Fulmars were on air patrol at 1120 (three in Red Section, two in White Section) when a single contact was detected at 12,000ft. It was found to be a SM79, which was promptly shot down. One Fulmar of Red Section lost its cockpit’s sliding hood during this engagement and was forced to land on Illustrious at 1145.
This left four fighters on the air patrol.
Lt Robert Henley reported:
‘An aircraft identified as a Messerschmitt 109 attempted to join the formation, but did not attack. When it broke away, the Fulmars proved too slow to pursue it’.
Early in the morning, a strike of Swordfish had been flown off from Illustrious to hit an Italian convoy. These had returned and had been struck below to refuel and rearm before the German attack developed. Several pairs of Swordfish were still in the air, scouring the seas around the convoys on anti-submarine patrols.
Attack 1
At 1220 hours Force A detected a group of unidentified aircraft on radar some six miles from the fleet. The CAP fighters were immediately directed to intercept.
Two Savoia SM79 torpedo bombers came into sight two minutes later.
They had approached from below the radar horizon and raced low through the fleet towards the starboard side of the carrier, met only by light anti-aircraft fire.
The bombers dropped their torpedoes some 2500 yards distant from Illustrious which took urgent evasive action by swinging to port. Both torpedoes passed astern, but went on to only narrowly miss the nearby HMS Valiant.
Lt Henley reported:
‘The S79s made a low pass over the fleet, which drew us off at low altitude and high speed to the southeast, and this in turn allowed the Germans to make their attack.”
HMS Illustrious’ Fulmars had dived from 14,000ft to chase the low-level Savoias. Red Section engaged as the SM79s fled the fleet, expending all their ammunition in the effort.
White Section continued the chase but was unable to catch the fleeing bombers. But, as they passed over Linosa Island, they saw an SM79 standing in a field – which they promptly strafed.
Red Section reported its lack of ammunition and set course to land and re-arm on Illustrious. They had been scheduled to land at 1245.
Pilot's after-action report
RED SECTION: Pilot. Lieut. Henley. Observer. Mid. Cullen. Aircraft. 6F.
1015. Took off from ILLUSTRIOUS in company with 6G (Sub.Lieut. Marshall and 6H (Sub.Lieut. Griffith). Proceeded to 15, 000 feet for patrol. After several false alarms (friendly aircraft).
1120. Directed on to one S. 79 at about 11, 000 feet. Carried out a Section beam attack. Then attacked from astern and below until it burst into flames and dived in. Returned to patrol over Fleet with 6H and 6G returned to land on.
1210. Saw 2 S. 79’s making torpedo attack on Fleet. Dived after them and carried out stern attack about 5 miles from Fleet towards Linosa at a height of about 50 feet. Attack continued until ammunition was expended. Put starboard motor of leading S. 79 out of action and silenced rear guns of both aircraft. Returned to Fleet to land on but encountered barrage so sheered [sic] off. Carried out dummy attack on two JU. 87’s which turned away and dived to sea level. Then proceeded to Malta as instructed by R/ T and W/ T. Landed 1340.
1700. Patrolled over ILLUSTRIOUS – nothing sighted.
1830. Landed at Hal Far.

Close escort ... An armoured carrier (most likely HMS Formidable) with the battleship HMS Valiant trailing during a practice shoot.
1225: Scramble
When HMS Illustrious detected a second – much larger – raid at 1225, the Fighter Direction Officer knew the fleet was in trouble.
The air patrol was out of position and low on ammunition. The enemy formation was only 28 miles away, to the north. The fleet was itself about 85 miles west of Malta.
HMS Illustrious recalled the four Fulmars as soon as the raid was detected. The FDO also ordered them to climb. But the fighters had a long way to fly, and a lot of height to regain.
Their opponents were not to be the slow and flimsy Italian aircraft they had previously encountered.
While Illustrious had an effective and innovative fighter direction crew, communications to the Flag Officer aboard HMS Valiant was limited. The opportunity provided by the early warning was therefore squandered.
X Fliegerkorps had deployed a comprehensive strike force including:
43 Ju87 B and R model Stuka dive bombers of I StG1 and II StG2 with a detachment from StG3.
18 He111s of KG26
10 Bf110s of ZG26 were escort
Some sources state “a number” of Ju88s also took part.
Some accounts also say three Italian bombers flew “as guides”.
Four Fulmars and three Swordfish were already in position on HMS Illustrious’ deck for a scheduled 1235 rotation in air patrol.
The Fighter Direction Officer requested the relief flight be flown off as fast as possible. Several more Fulmars were rapidly hoisted onto the flight deck to supplement the defence.
At, 1230 Illustrious’ captain asked permission from the CinC to turn the fleet into the wind five minutes early.
The reply was slow in coming. Four minutes, to be exact.
At 1234, approval was received to alter course to launch aircraft. The ready Fulmars only began rolling down the deck as the German aircraft entered visual range.
Lt Vincent-Jones, flying as Lt Bill Barnes’ Tactical Air Officer (TAO), recalled:
“There was no CAP overhead and there were only six serviceable Fulmars in the hangar, two of which were brought up on the after lift. Barnes and I were leading the next section to take off and were on our way up to the bridge for briefing. I remember being told to get airborne as fast as possible as a huge formation was approaching from the northwards.”
Report from Commanding Officer,
HMS Illustrious to Rear Admiral, Aircraft Carriers, Mediterranean[ADM 267/ 83] 26 January 1941
8. Tactics of attacking aircraft.
The attacking aircraft consisted of two formations of JUNKERS 87 with German markings. It was difficult to count the numbers exactly but the first formation consisted of 15 and the second of 20 to 30 aircraft. They were in a very loose and flexible formation, constantly changing their relative positions, and split when engaged by long range fire. It is estimated that the dive was started at about 12,000 feet and checked at 6000 to 8000 feet before going into the aiming dive. Bomb release varied from about 1500 feet in the first wave to 800 feet in later ones. Most aircraft continued to dive after releasing their bombs and flattened out low over the water having crossed the flight deck. At least one aircraft machine gunned the ship. The majority of the aircraft attacked ‘Illustrious’.9. Most of the bombs dropped were large SAP bombs of about 500kg. but some smaller bombs (either direct action or with very short delay) may have been used as the damage from certain hits was appreciably less than others.
Report on aircraft encountered
1. All those encountered bore the standard German markings.
2. Camouflage. Black and grey mottling above, half black and half white below. General camouflage similar to a Fulmar.
3. Tactics.
(i) Single JU. 87 when attacked from astern will pull the nose up in order to allow the rear gunner a good downward shot.
(ii) If attacked in formation, two of formation drop astern and use their front gun on the attacking aircraft.
4. A Fulmar should have no difficulty in catching or outmanoeuvring a JU. 87. Being of metal construction, a JU. 87 will not burn like an Italian aircraft. JU. 87 s appear to be well protected from stern attacks. Every endeavour should be made to carry out beam and quarter attacks.

Smoke begins to bellow from HMS ILLUSTRIOUS' aft deck as the opening moves of X Fliegercorp's attack take place. Painting by Kevin Clarkson @KevinStuart56, website HERE . This picture is © Richard Todd
Even then HMS Illustrious was unlucky: One Fulmar queued for take-off suffered engine-failure and had to be hauled out of line.
At 1235, the enemy formation came into sight at 12,000ft.
By 1237, the last aircraft left the deck even as the first bombs fell.


1238: Attack 2
The main assault lasted just seven minutes.
A group of about 30 Stukas headed towards Illustrious. Another 10 went after the battleships as a diversion to split the anti-aircraft fire.
Their actions demonstrated the value of experience, planning and training.
The approaching Stukas formed into three clover-leaf formations, with the planes continually changing height, speed and position to evade anti-aircraft fire. Diving from 12,000ft to about 7000ft, the Stukas then positioned themselves for attack. Their dives ranged from 65 to 80 degrees.
Despite having no ammunition, Red Section’s Fulmars made dummy attack runs in an effort to disrupt the enemy’s aim.
Lt Henley reported:
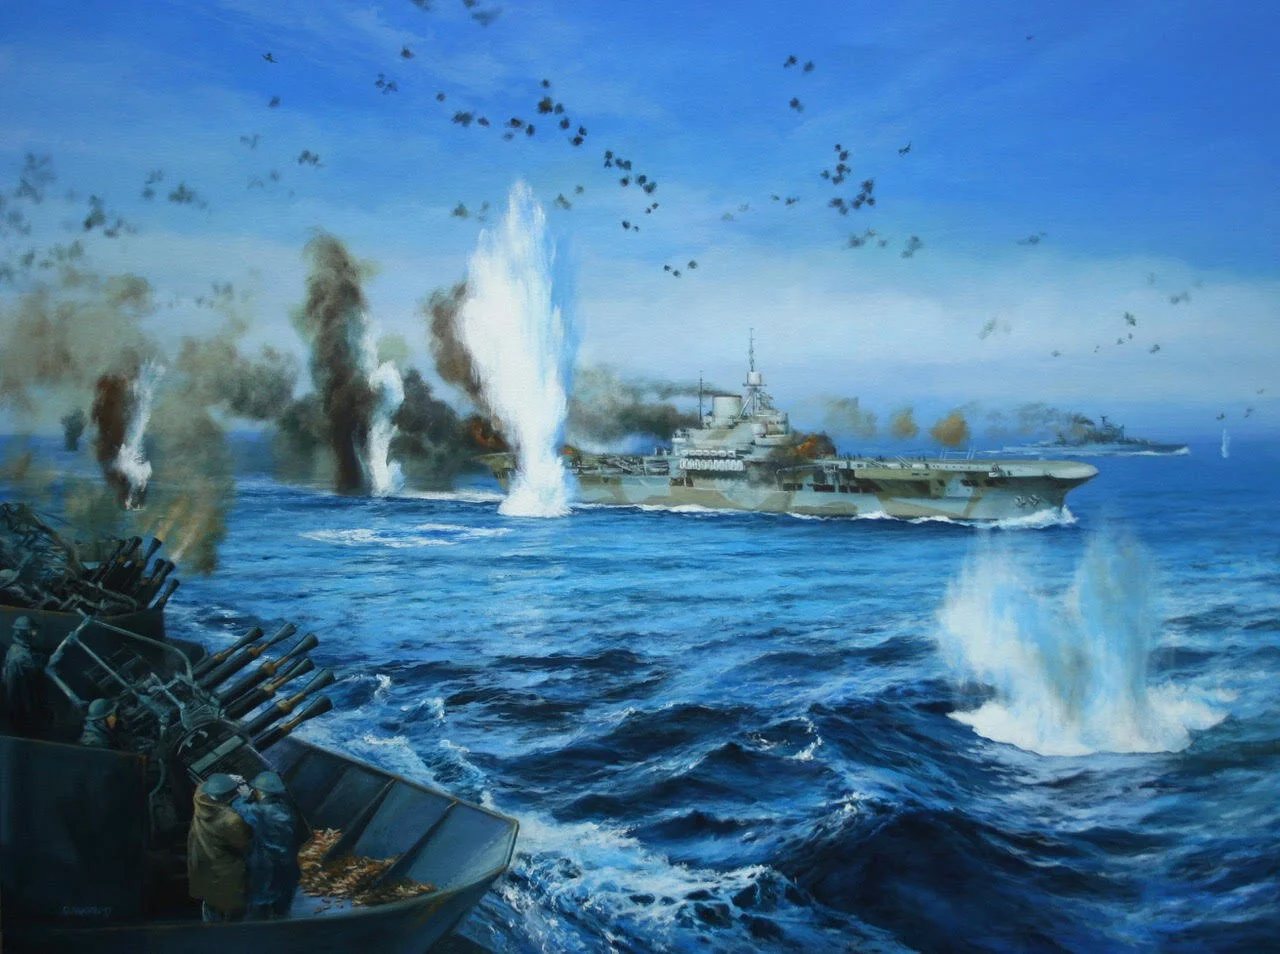
HMS VALIANT and WARSPITE attempt to cover HMS ILLUSTRIOUS from the dive-bomber attack. Painting by Kevin Clarkson @KevinStuart56, website HERE This picture is © Richard Todd
“By the time I got back, without ammunition, all I could do was to make dummy passes at them as they started their dives on the carrier.’
They successfully forced two Ju87s to jettison their bombs early.
The two remaining patrol Fulmars had been struggling to regain height and position after breaking off their chase of the Italian torpedo bombers. The four freshly launched Fulmars (two in Blue Section and two in Yellow Section) were also encumbered by their 1200ft per minute climb rate.

Smoke rises after a bomb bursts on HMS Illustrious' aft deck.
Denis Tribe was the observer in Fulmar Q, flown by Sub Lt Jackie Sewell.
“We were at readiness on the flight deck and took off before Illustrious was to wind. Before we were at 2000ft the first bomb from a Ju87 hit the ship. It went into the open lift well and exploded in the hangar – it was really horrific to watch as you realised how many would be blown to bits – also a very close escape. As we climbed to attack the Stukas were diving to bomb. When we reached height the air seemed full of aircraft. From the rear seat I saw one go down and another was damaged. It wasn’t long before we were out of ammunition and landed at Hal Far.”
The Fulmars put up a valiant – but largely ineffectual – fight.

A bomb bursts off the bows of the burning HMS ILLUSTRIOUS. The attacking Stuka can be seen in the far top right corner pulling out from its dive.
Captain Boyd later concluded:
“This attack came at a bad moment for the fighters. Those in the air had already been engaged in two combats and were low down, and with little ammunition remaining. Relief fighters were ready on deck, but as the whole fleet had to be turned by signal from the Commander-in-Chief before they could be flown off, valuable minutes were wasted. In any case the Fulmar has not sufficient climbing speed to ensure being able to counter this type of attack, particularly if a heavy attack is launched shortly after a minor or diversionary attack.”

A Stuka pulls away as HMS ILLUSTRIOUS burns. Her PomPoms in front of the bridge are disabled, a Port PomPom has been hit, a thin wisp of smoke is seen coming from the buckled forward lift, as well as the 19-22in hole in the amidships flight deck from the 2200lbs bomb hit. A mushroom cloud of fire is billowing from the aft lift. Painting by Kevin Clarkson @KevinStuart56, website HERE This picture is © Richard Todd
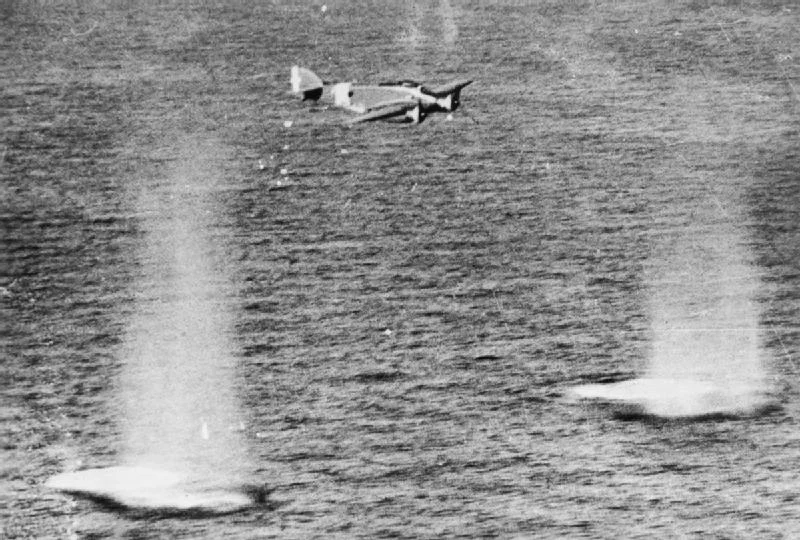
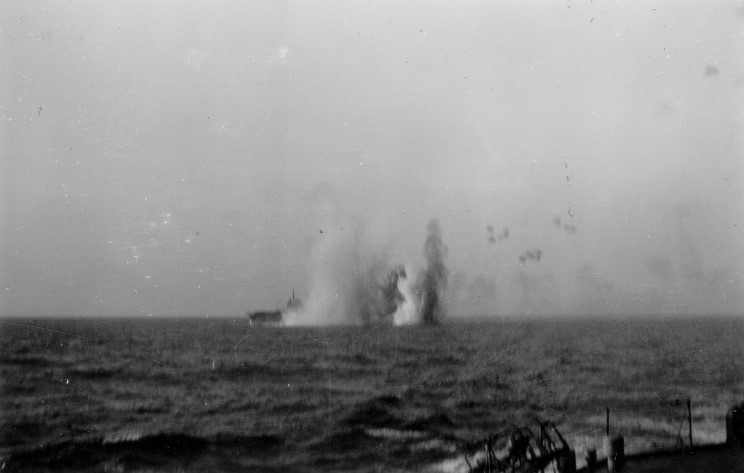
In skies pocked with flak-bursts and waters rippled by bomb blasts, the burning HMS Illustrious is photographed by her assailants as an escort crosses astern.
The fleet claimed two Stukas shot down by anti-aircraft fire.
White Section arrived as the attack ended. Despite having already expended half their ammunition, the flight claimed one Ju87 shot down and two damaged.
The freshly launched Blue Section reported to have shot down one Ju87 before it had dropped its bombs. Yellow Section claimed two victims after they had bombed.
The claims were ambitious: X Fliegerkorps reported losing only three Stukas in that day’s fighting.
Lt Vincent-Jones would write:
“Meanwhile, Barnes had no shortage of targets – he had, in fact, too many, and contented himself with pumping bursts into Stuka after Stuka as they came through his sights – and there was no question of not being able to see the whites of their eyes! I found it difficult to see what was going on up front, but I saw one Stuka go down with smoke pouring out of its engine. Despite their slow speed the Stuka did not respond easily to .303 bullets as they bounced off a sheet of armour fitted at the rear of the back seat to protect the air gunners… The next thing I remember was Bill Barnes telling me that we were out of ammunition.”

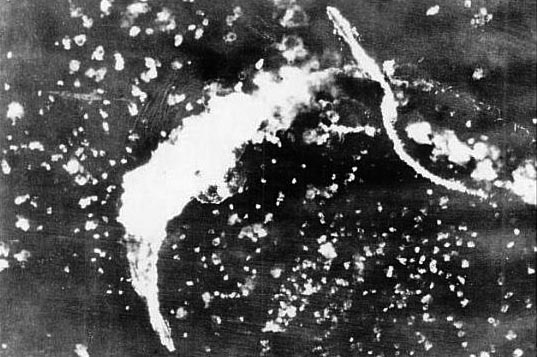
This picture is the first in a sequence of two which shows the flight deck of ILLUSTRIOUS after she was hit on the armoured flight deck and in the aft liftwell. It has been incorrectly dated in the IWM archive. The white smoke emerging from the centreline is from the 19in hole created by the 2200lbs hit, while the grey smoke from the right of the image is likely from the burning bow. The toppled lift is in the background, jutting upwards against the smoke.
During the engagement, one Fulmar of Blue Section was shot down.
Crewed by Sub Lt Lowe and observer Kensett, the Fulmar had been seen to shoot down a Ju87 as another moved on to its tail. An ensuing burst of machine-gun fire killed Kensett and wounded Lowe in the shoulder. The fighter ditched near the destroyer HMS Nubian, but Lowe was not seen to get out of the cockpit. Some 30 minutes later, HMS Jaguar spotted Lowe bobbing in the water by pure chance.
One Swordfish also ditched. The crew was picked up by a destroyer.
This aircraft was piloted by Lt Charles Lamb of 815 Squadron. He had been in the landing circuit after completing his anti-submarine patrol as the attack developed. After a series of desperate aerobatics to avoid being shot-down by the swooping Stukas, Lamb circled the fleet to watch developments. With a punctured fuel tank, he eventually ditched his Swordfish alongside the destroyer HMS Juno.
The seven remaining airborne Fulmars, without another carrier to land-on, were ordered to fly to Malta to refuel and rearm.
Nine of Illustrious’ Swordfish also were in the air at the time of the attack.
Puncture wound ... A snake of smoke curls out of the 19-22in hole in the 3in armoured portion of Illustrious' flight deck as the hardened steel steams from the inferno in the hangar below. The toppled aft lift at the rear is also venting thick smoke and steam.
Click on the image for a full-resolution view. Picture courtesy John Clark
Aboard Illustrious
HMS Illustrious’ high-angle 4.5in and pom-pom batteries were restrained for up to a minute in opening fire as the Fulmars and Swordfish took off.
The Fulmar which failed to start appears to have been wheeled back to the aft lift, ready to be struck-down below.
With the battleships focused on evading the diversionary strike, the carrier was left virtually unsupported.
The attack that unfolded was devastating.
The first Stukas dropped their bombs from about 1500ft. Later waves went so low as 800ft before releasing their weapons.
Thirteen minutes after the initial radar contact, the first bomb struck HMS Illustrious.
One of the last Fulmar’s to leave Illustrious’ deck was piloted by Lt Bill Barnes with Lt Vincent-Jones as his observer:
“When we had reached a few hundred feet we found ourselves surrounded by Ju87s as they were pulling out of their dives. Some were very close and I could clearly see the rear gunners firing at us. I looked down and saw poor Illustrious passing through huge columns of water, with smoke coming from the after end of the flight deck.”
The spectacle wasn’t reserved for the Fulmar crews. The Swordfish also had prime seats.

Report of Air Attacks on HMS Illustrious during Operation MC4, 26 January, 1941
(0404/427/172, No. 3320/0197, AIR2/ 4221)
It was difficult to count the number exactly but the first formation consisted of 15 and the second of twenty to thirty aircraft. They were in a very loose and flexible formation, constantly changing their relative positions, and split when engaged by long-range fire. It is estimated that the dive was started at about 12,000ft and checked at 6000 to 8000ft, before going into the aiming dive. Bomb release varied from about 1500ft in the first wave to 800ft in the later ones. Most aircraft continued to dive after releasing their bombs and flattened out low over the water having crossed the flight deck. At least one aircraft machine-gunned the ship.
The attack on Illustrious appeared to come in three main waves, in each of which two sub-flights of three carried out synchronized attacks from different bearings, the majority coming from astern and fine on each quarter. At any one moment there were about six aircraft in their dives requiring to be fired on. Time was hard to judge but each wave probably lasted for about one minute, the pause between waves being about thirty seconds. The average angle of dive was about 60 degrees through a few aircraft seemed to dive at about 80 degrees. Each aircraft dropped one bomb – estimated size 1000lb. From inspection of the damage it is probable that the earlier bombs were fitted with direct-action fuses while the later ones were armour piercing.
* * *

Damage control teams aboard HMS ILLUSTRIOUS strive to respond even as the Stukas swoop. The PomPoms in front of the bridge burn, white smoke and steam vents from the 19-22in hole in the deck as the many hits in the aft lift produce a fireball. Painting by Kevin Clarkson @KevinStuart56, website HERE This picture is © Richard Todd
A crewman of one of the biplane bombers ranged on Illustrious’ deck recalled the event:
“Suddenly there was a loud explosion on my right-hand side and I felt the whole plane shake as a shock wave buffeted me too – the twin 4.5inch gun turret a few feet away had opened fire, its barrels pointing vertically over the flight deck, and following their line, I looked up to see a mass of aircraft coming in fast immediately over the fleet, and they were not ours. We were frantically waved off and up the deck, even though the ship was still swinging rapidly to starboard to turn into the light breeze. By now all our 4.5inch guns and pom-poms were blazing away straight above my head. We rumbled off as the enemy, gracefully it seemed, wheeled over in succession and dived straight down, almost as if they wanted to look down the funnel. As we passed the island the first bomb exploded at the after end of the flight deck where we had been parked seconds before. The sea around Illustrious was boiling with falling shrapnel and I saw that another direct hit had been scored, this time plumb in the middle of the flight deck.”
HMS Illustrious was in serious trouble. She had been hit six times. For three hours her fate hung in the balance.
Fires were raging out of control inside her hangar – other ships in the fleet could see the flames venting out of the aft lift well. Several other compartments were also ablaze, most notably near the forward magazine.
The damage wasn't entirely one-sided. According to "Report of Air Attacks on HMS Illustrious during Operation MC4, 26 January, 1941":
"About twenty feet of the wing of a Ju87 fell on the after lift. Aircraft assumed to have crashed. A Ju87 was seen to fall into the sea by the Chaplain and another crashed into the sea just astern of one Swordfish on A/S patrol"
At 1255, Illustrious’ electric steering gear failed. Her rudder was unresponsive. Captain Boyd ordered the flag signal “I AM NOT UNDER CONTROL” raised as the engines were urgently altered to keep the carrier on course.
Steerage was regained by 1303 through use of auxiliary steam mechanisms.


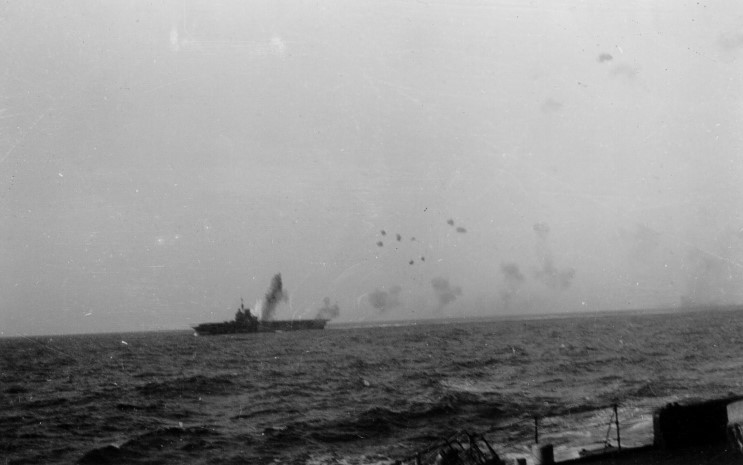
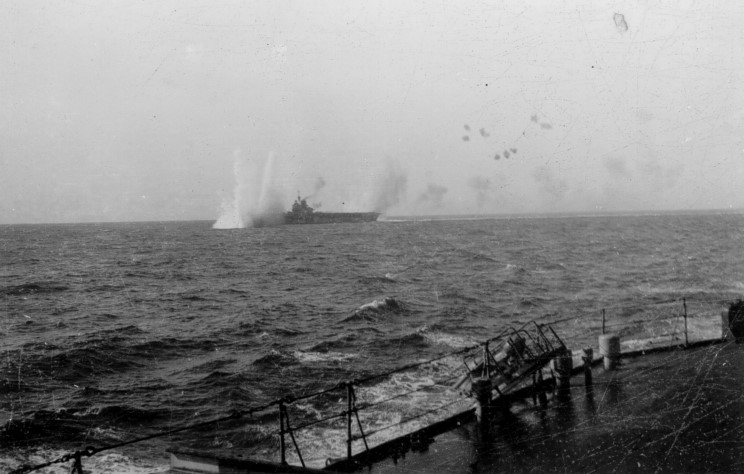
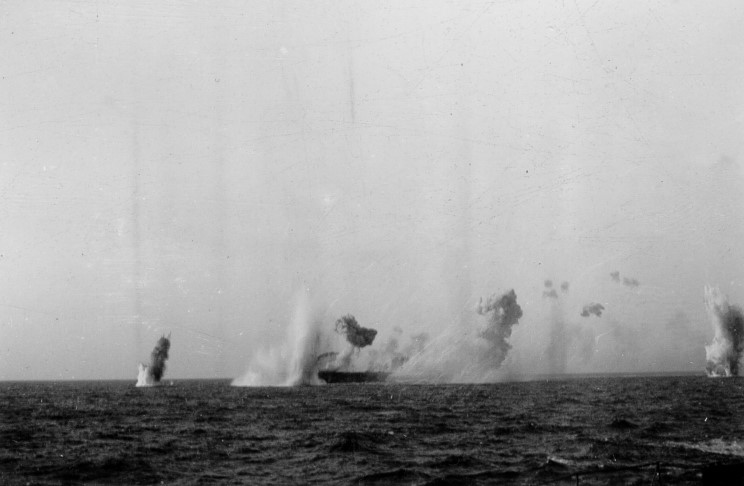
Captioned "attack on HMS ILLUSTRIOUS 10 January 1941", this picture may actually show bombs falling around HMS VALIANT or WARSPITE during that action.
1329: Attack 3
Ominously, Illustrious’ radar had been put out of operation by the bomb hits. But the second wave was detected by HMS Valiant, and the escort and fighters warned.
Captain Boyd’s report says the raid by seven Italian high-altitude S79 bombers began at 1329. The bomber formation at 14,000ft was engaged before their payloads could be released accurately. Splashes were observed scattered around the fleet.
But the attack had some effect. As Illustrious manoeuvred to evade the bombs – some of which fell near - her steam steering gear failed.
The carrier was again out of control, steaming slowly in circles to port.
Click on the image for a larger view. This is a preliminary HMS Illustrious battle damage drawing compiled by the Norfolk Navy Yard. For more battle damage drawings and pictures, view the damage report pages linked to this page. Picture courtesy 'Researcher at Large'
Ordeal by fire
The flight deck was inoperable. The damage and fires around the aft lift simply made landing-on operations impossible – even if the carrier could turn into the wind, which it could not. The forward lift also had been displaced.
According to Swordfish pilot Charles Lamb, the hangar itself was like a scene from Dante’s Inferno:
“(The hangar fire screens) disintegrated at once, bursting apart in masses of red hot steel splinters about three or four feet long, which tore through every obstruction setting on fire all the aircraft that were not already burning and decapitating anyone who might be standing in the way.”
A flash report from the CinC to the admiralty immediately after the attack reported 11 Swordfish and five Fulmars stowed in the hangar had been destroyed. Others sources say nine Swordfish and four Fulmars were lost.
Despite the damage, the major aviation fuel lines were not ruptured and the strict policies about volatile liquids and munitions in the hangar space were paying off.
The fires were bad; but not uncontrollable.
Illustrious’ speed had dropped first to 21knots, but by 1345 she was making only 15knots.
Work to restore the steam steering succeeded at 1348.
But the success was short lived.
At 1350, it failed again.
Extract from
War in a Stringbag
By Charles Lamb"When the first bomb exploded after bouncing off the lift, all the metal fire screen curtains were down, dividing the hangar into three separate “fire proof” compartments. When subjected to a blast capable of bending a 300ton lift they were useless... Poor Neil Kemp was killed by one of them immediately. He had been standing in the middle of the hangar talking to Jackie Jago when the first sudden explosion occurred. Jackie found himself facing a headless body, which was all that was left of a fine chap…
The people in the hangar threw themselves on their faces on the steel deck to let everything pass over them. The bullets from the burning aircraft were whizzing round and round the hangar like hundreds of rubber balls being fired into an enclosed squash court, and nobody could stay in the hangar and live. The heat was quite unsupportable, and noxious fumes were escaping from exploding oxygen chambers, from the burning acid of batteries. The unfortunate men inside seized the first opportunity to rush out of the hangar through the airtight doors to the comparative safety of the battery-space outside; but after the first bomb there were very few left alive to do so."
HMS Illustrious eventually regained steerage at 1434 through alternating the revolutions to her three screws. This was only possible once the rudder had been jammed into an amidships position.
Captain Boyd later wrote:
“When this very severe and brilliantly executed D/ B attack was over, the ship was on fire fore and aft, the flight deck was wrecked, and I decided to make for Malta at once, informing the Commander in Chief who detached ‘Jaguar’ and ‘Hasty’ as screen.”
Malta was some 75 miles away. It was to be a six-hour trial by fire.

Men were trapped. Fires continued to rage. Shrapnel had jammed part of the fire sprinkler system on – contributing to the flooding of the ship. At one point the power failed, and the fire-fighting pumps were put out of action.
Stokers in the boiler room had to contend with extreme temperatures and a ventilation system full of thick smoke. Struggling with the heat, many would pass out from exhaustion.
The four aft high-angle 4.5in gun mounts were out of action. Their fire control circuits had been destroyed and ammunition conveyors hit. Fires raged around the forward magazines.
Captain Boyd made a daring decision: He would not flood the magazines. This enabled the ship to continue defending itself.
He would later write:
“The guns crews (with about 60% of the armament) beat off the subsequent attacks.”
Illustrious was severely wounded.
But her engines were intact. There was still a chance to save her.
At a steady 17 knots, Illustrious limped towards refuge.

1604: Attack 4
The Germans and Italians had the scent of blood. They were determined to sink the crippled carrier, so several strikes were hastily organised and flung at HMS Illustrious.
The battered carrier did get intermittent air cover from Malta as she struggled towards safety – three of her own Fulmars were now operating out of Hal Far with nine Hurricanes. HMS Valiant and Warspite were still in company along with the destroyers HMS Hasty and Jaguar.
She was still some 45 miles from Valetta harbour.
Late that afternoon, at 1604, another strike was reported on radar by HMS Valiant – this time of about 15 Italian Ju87s from 237a Squadriglia with an escort of about five Italian single-seat fighters. Three Ju88s of LGI also appear to have taken part in a raid about this time, only to be chased off by Malta's Hurricanes.
Illustrious was unable to take effective evasive manoeuvres because of her damage. Her fires were still burning out of control.
Fortunately the attack was nowhere near as well synchronised as the first.

A Stuka is seen in a dive .
The first wave of six Ju87s attacked from astern shortly after coming into view at 1609. HMS Illustrious’ forward 4.5in mounts and four remaining pom-pom mounts contributed to the defence, despite being hampered by thick haze and smoke from the hangar fire.
Only two bombs fell near the ship.
A second wave of three Ju87s dove in on the starboard side a minute later. A near-miss abreast the conning-tower funnel shook the ship violently. Another burst just off the quarterdeck, killing and wounding those assembled there to tend the injured.
Captain Boyd’s report does not state exactly when the final bomb hit the aft lift during this raid. He only reports six further Stukas retiring at height, with two being diverted from their attack run without dropping their bombs.
But the damage was significant.
Many of those tending wounded in the hangar and fighting the fires were killed.
A near-miss also killed one man and wounded three aboard HMS Valiant.
Admiral Cunningham later commented:
“One of the staff officers who watched it hurtling over the bridge from astern told me it looked about the size of the wardroom sofa.”
Illustrious was now listing some 5 degrees to starboard. This was from the fire-fighting water trapped in the hangar and wardroom flat – the scuppers had been blocked.

1710: Attack 5
HMS Valiant’s radar again demonstrated its worth at 1656 when enemy aircraft were detected at 52 miles. Seventeen aircraft came into view at 1710 and then proceeded to circle the fleet to make an approach from up-sun and astern.
The combined high-level and dive-bombing attacks appear mainly to have been directed at the battleships. None came close.
Several Ju88's of LGIII reportedly took part in this raid.
After refueling and rearming at Malta, several of Illustrous’ Fulmars returned to the scene – a little too late. A long stern chase developed.
Lt Vincent-Jones described the scene:
“We soon sighted Illustrious on her way towards the Grand Harbour with smoke pouring out of her but still making a good 20 knots. She had parted company with the rest of the fleet. We were not in time to intercept before the attack developed but we caught up with the enemy on their way back to Sicily…”
Illustrious had to nose her own way through the swept channel leading to the harbour entrance. The requested tugs were nowhere to be seen. Only two anti-submarine patrol vessels came out to assist. But the Axis air attacks were not over.
An hour after sunset as HMS Illustrious limped within five miles of the entrance to Valetta harbour, yet another attack developed.
Malta radioed an urgent air-raid warning. Two aircraft were at first heard and then briefly sighted off the starboard bow at 1922. The 4.5in and pom-poms fired a blind barrage as a deterrent. The aircraft withdrew.
Alarmingly, HMS Hasty reported a sonar contact at 1930. Depth-charges were fired but no torpedo tracks were seen.
Illustrious' Fight For Life
Kenneth PoolmanSlowly they fought the ship to Malta, through several more heavy attacks, her stokers maintaining steam in a temperature of 140 degrees, with the air vents sucking in thick, acrid smoke, her gunners keeping up a fierce barrage with the fury and blind anger of men who were watching their shipmates die and agonise all around them, and their beloved, beautiful ship smashed into punch-drunk helplessness...
Wearily Bill climbed up through the ladderways and hatchways in the dark on to the flight-deck. In the darkness the fires at the after end still glowed. Over on the beam a ship was flashing a message. The carrier moved slowly forward, uncannily quiet now, except for the hissing of steam. Somebody broke the silence by saying, ‘I can smell the goats in Malta.’ Someone else said, ‘Where shall we go tonight, the Vernon or the White Ensign— or Jimmy Bung’s bar?’ Everywhere tense nerves quivered in worn-out bodies. A man suddenly screamed with delayed shock. His oppos took hold of him and quietened him down. The magazine parties came up, grimy and puffy-eyed, from the stinking darkness that had imprisoned them all day, and asked for news ... Everyone came up into the fresh air, clambering stiffly up to the flight-deck and gaping dully at the shambles there. As the ship slowly passed the harbour mouth, cheering rose up on either hand. Slowly Illustrious came alongside the dockyard wall, then stopped, as if with head bowed.
CLICK on the image above to be taken to the original pdf source. CLICK HERE to be taken to the armouredcarriers.com analysis of bomb damage to HMS Illustrious.
MORE ON ILLUSTRIOUS